SEO Friendly Lazy Loading of Images Example

SEO Friendly Lazy Loading of Images Example

Hi Dev,

In this example,I will learn you how to implement seo friendly lazy loading of images. we will show example of seo friendly lazy loading of images. you can easyliy implement lazy loading of images.

What is Lazy Loading?

Lazy loading is an optimization technique for the online content, be it a website or a web app.

Instead of loading the entire web page and rendering it to the user in one go as in bulk loading, the concept of lazy loading assists in loading only the required section and delays the remaining, until it is needed by the user.

Here, I will give you full example for simply seo friendly lazy loading of images as bellow.

Example
<!DOCTYPE html>
<html>
<head>
  <title>SEO Friendly Lazy Loading of Images example</title>
</head>
<body>
<h1>SEO Friendly Lazy Loading of Images Example</h1>

//image-lazy
<img class="lazy-image" data-src="yourImagePath.jpg" />

<script src="https://cdnjs.cloudflare.com/ajax/libs/jquery/3.5.1/jquery.min.js"></script>
<script>
document.addEventListener("DOMContentLoaded", function () {
    var e = [].slice.call(document.querySelectorAll("img.lazy-image"));
    if ("IntersectionObserver" in window) {
        let n = new IntersectionObserver(function (e, t) {
            e.forEach(function (e) {
                if (e.isIntersecting) {
                    let t = e.target;
                    (t.src = t.dataset.src), t.classList.remove("lazy-image"), n.unobserve(t);
                }
            });
        });
        e.forEach(function (e) {
            n.observe(e);
        });
    }
});
</script>
</body>
</html>

It will help you...

Laravel 8 Google Recaptcha V3 Example

Laravel 8 Google Recaptcha V3 Example

Hi Dev,

Today,I will learn you how to integrate google recaptcha v3 in laravel 8 application. We will talk about laravel 8 google recaptcha implement example tutorial. In this article i will show how to implement google v3 ReCAPTCHA with laravel 8 forms.

This example will give simple way to laravel implement google v3 Recaptcha tutorial, you will learn how to add google v3 Recaptcha with the contact us form in laravel 8.

Here I will give you full example for google recaptcha v3 example in laravel 8. So, let's follow few step to create example of laravel 8 google recaptcha v3 example tutorial.

Step 1 : Install Laravel 8

In the first step, we need to get fresh laravel 8 version application So let's open terminal and run bellow command to install fresh laravel project.

composer create-project --prefer-dist laravel/laravel blog
Step 2 : Database Configuration

In second step, we will make database Configuration for example database name, username, password etc. So lets open .env file and fill all deatils like as bellow:

.env
DB_CONNECTION=mysql
DB_HOST=127.0.0.1
DB_PORT=3306
DB_DATABASE=here your database name(blog)
DB_USERNAME=here database username(root)
DB_PASSWORD=here database password(root)
Step 3 : Install josiasmontag/laravel-recaptchav3

In this step, we need josiasmontag/laravel-recaptchav3 package. you can install google v3 recaptcha validation package in laravel 8 google v3 recaptcha validation app. So let's open terminal and run bellow command:

composer require josiasmontag/laravel-recaptchav3

After install above package you can add providers and aliases in config file. So lets run bellow command to publish the config file:

php artisan vendor:publish --provider="Lunaweb\RecaptchaV3\Providers\RecaptchaV3ServiceProvider"

Then add the site key and secret key on .env file provided by google recaptcha website. Like following:

NOCAPTCHA_SITEKEY=secret_site_key
NOCAPTCHA_SECRET=secret_key 

If you are not register your site with google v3 recaptcha website. So, you can Click Here. And registered your site with filing simple google form.

Then you will get a google client id and secret from the google Recaptcha website.

Step 4 : Create Model and Migration

we are going to create google recaptcha v3 application for contactus. so we have to create migration for "contact_us" table and model using laravel 8 php artisan command, so first fire bellow command:

php artisan make:model ContactUs -m

After this command you will find one file in following path "database/migrations" and you have to put bellow code in your migration file for create posts table.

<?php

use Illuminate\Database\Migrations\Migration;
use Illuminate\Database\Schema\Blueprint;
use Illuminate\Support\Facades\Schema;

class CreateContactUsTable extends Migration
{
    /**
    * Run the migrations.
    *
    * @return void
    */
    public function up()
    {
        Schema::create('contact_us', function (Blueprint $table) {
            $table->id();
            $table->string('name');
            $table->string('email');
            $table->string('subject');
            $table->text('message');
            $table->timestamps();
        });
    }

    /**
    * Reverse the migrations.
    *
    * @return void
    */
    public function down()
    {
        Schema::dropIfExists('contact_us');
    }
}

Now you have to run this migration by following command:

php artisan migrate

Now you can add all table column in fillable So let's open model file put bellow code.

app/Models/ContactUs.php
<?php

namespace App\Models;

use Illuminate\Database\Eloquent\Factories\HasFactory;
use Illuminate\Database\Eloquent\Model;

class ContactUs extends Model
{
    use HasFactory;

    protected $table = 'contact_us';

    protected $fillable = ['name', 'email','subject','message'];
}
Step 5: Create Routes

Here, we need to add route for google recaptcha v3 form. so open your "routes/web.php" file and add following route.

routes/web.php
<?php
use App\Http\Controllers\GoogleV3CaptchaController;

Route::get('google-v3-recaptcha', [GoogleV3CaptchaController::class, 'index']);
Route::post('validate-g-recaptcha', [GoogleV3CaptchaController::class, 'validateGCaptch']);
Step 6: Create Controller

After add route, we need to add method of google recaptcha, first put bellow code on your GoogleController.php file

app/Http/Controllers/GoogleV3CaptchaController.php
<?php
 
namespace App\Http\Controllers;
use Illuminate\Http\Request;
use App\Models\ContactUs;
use Validator;
use Session;

class GoogleV3CaptchaController extends Controller
{
    public function index()
    {
        return view('google-v3-recaptcha');
    }
 
    public function validateGCaptch(Request $request)
    {
        $input = $request->all();

        $validator = Validator::make($input,[
            'name' => 'required',
            'email' => 'required',
            'subject' => 'required',
            'message' => 'required',
            'g-recaptcha-response' => 'required',
        ]);

        if ($validator->passes()){
            ContactUs::create($input);
            return redirect('google-v3-recaptcha')->with('status', 'Google V3 Recaptcha has been validated form');
        }

        return redirect()->back()->withErrors($validator)->withInput();
    }
}
Step 7: Create Blade File

Ok, now at last we need to add blade view so first create new file login.blade.php file and put bellow code:

resources/views/google-v3-recaptcha.blade.php
<!DOCTYPE html>
<html>
<head>
    <title>How to Use Google V3 Recaptcha Validation In Laravel 8 Form</title>
    <meta name="csrf-token" content="{{ csrf_token() }}">
    <link rel="stylesheet" href="https://stackpath.bootstrapcdn.com/bootstrap/4.5.2/css/bootstrap.min.css">
</head>
<body>
    <div class="container mt-4">
        @if(session('status'))
            <div class="alert alert-success">
                {{ session('status') }}
            </div>
        @endif
        <div class="card">
            <div class="card-header text-center font-weight-bold">
                <h2>Laravel 8 Contact Us - Adding Google V3 Recaptcha</h2>
            </div>
            <div class="card-body">
                <form name="g-v3-recaptcha-contact-us" id="g-v3-recaptcha-contact-us" method="post" action="{{url('validate-g-recaptcha')}}">
                    @csrf
                    <div class="form-group">
                        <label for="exampleInputEmail1">Name</label>
                        <input type="text" id="name" name="name" class="@error('name') is-invalid @enderror form-control">
                        @error('name')
                            <div class="alert alert-danger mt-1 mb-1">{{ $message }}</div>
                        @enderror
                    </div>          
                    <div class="form-group">
                        <label for="exampleInputEmail1">Email</label>
                        <input type="email" id="email" name="email" class="@error('email') is-invalid @enderror form-control">
                        @error('email')
                            <div class="alert alert-danger mt-1 mb-1">{{ $message }}</div>
                        @enderror
                    </div>           
                    <div class="form-group">
                        <label for="exampleInputEmail1">Subject</label>
                        <input type="text" id="subject" name="subject" class="@error('subject') is-invalid @enderror form-control">
                        @error('subject')
                            <div class="alert alert-danger mt-1 mb-1">{{ $message }}</div>
                        @enderror
                    </div>      
                    <div class="form-group">
                        <label for="exampleInputEmail1">Message</label>
                        <textarea name="message" class="@error('description') is-invalid @enderror form-control"></textarea>
                        @error('message')
                            <div class="alert alert-danger mt-1 mb-1">{{ $message }}</div>
                        @enderror
                    </div>
                    <div class="form-group">
                        <input type="hidden" name="g-recaptcha-response" id="recaptcha">
                    </div>
                    <button type="submit" class="btn btn-primary">Submit</button>
                </form>
            </div>
        </div>
    </div>    
    <script src="https://www.google.com/recaptcha/api.js?render={{ config('services.recaptcha.sitekey') }}"></script>
    <script>
             grecaptcha.ready(function() {
                 grecaptcha.execute('{{ config('services.recaptcha.sitekey') }}', {action: 'contact'}).then(function(token) {
                    if (token) {
                      document.getElementById('recaptcha').value = token;
                    }
                 });
             });
    </script>
    <!-- <script src="https://www.google.com/recaptcha/api.js?render={{ config('services.recaptcha.sitekey') }}"></script> -->
    
</body>
</html>

Now we are ready to run our google recaptcha v3 example with laravel 8 so run bellow command for quick run:

php artisan serve

Now you can open bellow URL on your browser:

localhost:8000/google-v3-recaptcha

It will help you....

Laravel Tailwind CSS Modal Tutorial

Laravel Tailwind CSS Modal Tutorial

Hi Dev,

Today, I will learn you how to use tailwind css modal in laravel. We will talk about laravel tailwind css modal example. In this article i will give simple button click then open modal and close button in modal for close modal.

Tailwind CSS is the only framework that I've seen scale on large teams. It’s easy to customize, adapts to any design, and the build size is tiny.

Tailwind is so low-level, it never encourages you to design the same site twice. Even with the same color palette and sizing scale, it's easy to build the same component with a completely different look in the next project.

Here I will give you full example for laravel tailwind css example so let`s see the bellow step by step:

Step 1: Install Laravel Project

In this step, you need to download the laravel fresh setup. Use this command then download laravel project setup :

composer create-project --prefer-dist laravel/laravel blog
Step 2: Install Tailwind CSS Via NPM

In this step, you need install tailwind css and tailwind css requires Node.js 12.13.0 or higher using bellow command so let's install the tailwind css.

npm install

Install Tailwind and its peer-dependencies using npm:

npm install -D tailwindcss@latest postcss@latest autoprefixer@latest
Create your configuration file

you can generate your tailwind.config.js file using bellow command:

npx tailwindcss init

This will create a minimal tailwind.config.js file at the root of your project or open this file and paste bellow code:

tailwind.config.js
module.exports = {
    purge: [
        './resources/**/*.blade.php',
        './resources/**/*.js',
        './resources/**/*.vue',
    ],
    darkMode: false, // or 'media' or 'class'
    theme: {
        extend: {},
    },
    variants: {
        extend: {},
    },
    plugins: [],
}
Step 3 : Configure Tailwind with Laravel Mix

In this step, you can configure tailwind with laravel mix and change in your webpack.mix.js, add tailwindcss as a PostCSS plugin:

mix.js("resources/js/app.js", "public/js")
    .postCss("resources/css/app.css", "public/css", [
     require("tailwindcss"),
]);
Step 4 : Include Tailwind in your CSS

Open the ./resources/css/app.css file that Laravel generates for you by default and use the @tailwind directive to include Tailwind's base, components, and utilities styles, replacing the original file contents:

resources/css/app.css
@tailwind base;
@tailwind components;
@tailwind utilities;
Step 5 : Add Route
<?php
use App\Http\Controllers\HomeController;

Route::get('/', [HomeController::class,'index']);
Step 6 : Create Controller

Here In this step, you can create new controller as HomeController so let's open terminal and bellow artisan command to create controller.

php artisan make:controller HomeController
app/Http/Controllers/HomeController.php
<?php

namespace App\Http\Controllers;

use Illuminate\Http\Request;
use Illuminate\Support\Facades\Route;

class HomeController extends Controller
{
    public function homePage()
    {
        return view('tailwind-modal');
    }
}
Step 7 : Create Blade File

In last step, You can create modal view as tailwind-modal.blade.php So let's create tailwind-modal.blade.php file and paste bellow code:

resources/views/tailwind-modal.blade.php
<!DOCTYPE html>
<html>
<head>
    <title>Laravel Tailwind CSS Modal Example</title>
    <meta charset="UTF-8" />
    <script type="text/javascript" src="{{ asset('js/app.js') }}"></script>
    <meta name="viewport" content="width=device-width, initial-scale=1.0" />
    <link href="{{ asset('css/app.css') }}" rel="stylesheet">
    <script src="https://ajax.googleapis.com/ajax/libs/jquery/3.5.1/jquery.min.js"></script>
</head>
<body>
    <button type="button" class="focus:outline-none openModal text-white text-sm py-2.5 px-5 mt-5 mx-5  rounded-md bg-green-500 hover:bg-green-600 hover:shadow-lg">Open Modal</button>
    <!-- This example requires Tailwind CSS v2.0+ -->
    <div class="fixed z-10 inset-0 invisible overflow-y-auto" aria-labelledby="modal-title" role="dialog" aria-modal="true" id="interestModal">
        <div class="flex items-end justify-center min-h-screen pt-4 px-4 pb-20 text-center sm:block sm:p-0">
            <div class="fixed inset-0 bg-gray-500 bg-opacity-75 transition-opacity" aria-hidden="true"></div>
                <span class="hidden sm:inline-block sm:align-middle sm:h-screen" aria-hidden="true">​</span>
                <div class="inline-block align-bottom bg-white rounded-lg text-left overflow-hidden shadow-xl transform transition-all sm:my-8 sm:align-middle sm:max-w-lg sm:w-full">
                    <div class="bg-white px-4 pt-5 pb-4 sm:p-6 sm:pb-4">
                        <div class="sm:flex sm:items-start">
                            <div class="mx-auto flex-shrink-0 flex items-center justify-center h-12 w-12 rounded-full bg-red-100 sm:mx-0 sm:h-10 sm:w-10">
                                <svg @click="toggleModal" class="h-6 w-6 text-red-600" xmlns="http://www.w3.org/2000/svg" fill="none" viewBox="0 0 24 24" stroke="currentColor" aria-hidden="true">
                                    <path stroke-linecap="round" stroke-linejoin="round" stroke-width="2" d="M12 9v2m0 4h.01m-6.938 4h13.856c1.54 0 2.502-1.667 1.732-3L13.732 4c-.77-1.333-2.694-1.333-3.464 0L3.34 16c-.77 1.333.192 3 1.732 3z" />
                                </svg>
                            </div>
                            <div class="mt-3 text-center sm:mt-0 sm:ml-4 sm:text-left">
                                <h3 class="text-lg leading-6 font-medium text-gray-900" id="modal-title">
                                  Deactivate account
                                </h3>
                            <div class="mt-2">
                                <p class="text-sm text-gray-500">
                                    Are you sure you want to deactivate your account? All of your data will be permanently removed. This action cannot be undone.
                                </p>
                            </div>
                        </div>
                    </div>
                </div>
                <div class="bg-gray-50 px-4 py-3 sm:px-6 sm:flex sm:flex-row-reverse">
                    <button type="button" class="w-full inline-flex justify-center rounded-md border border-transparent shadow-sm px-4 py-2 bg-red-600 text-base font-medium text-white hover:bg-red-700 focus:outline-none focus:ring-2 focus:ring-offset-2 focus:ring-red-500 sm:ml-3 sm:w-auto sm:text-sm">
                        Deactivate
                    </button>
                    <button type="button" class="closeModal mt-3 w-full inline-flex justify-center rounded-md border border-gray-300 shadow-sm px-4 py-2 bg-white text-base font-medium text-gray-700 hover:bg-gray-50 focus:outline-none focus:ring-2 focus:ring-offset-2 focus:ring-indigo-500 sm:mt-0 sm:ml-3 sm:w-auto sm:text-sm">
                        Cancel
                    </button>
                </div>
            </div>
        </div>
    </div>
    <script type="text/javascript">
        $(document).ready(function () {
            $('.openModal').on('click', function(e){
                $('#interestModal').removeClass('invisible');
            });
            $('.closeModal').on('click', function(e){
                $('#interestModal').addClass('invisible');
            });
        });
    </script>
</body>
</html>

It will help you....

React Native Signature Pad Example

React Native Signature Pad Example

Hi Dev,

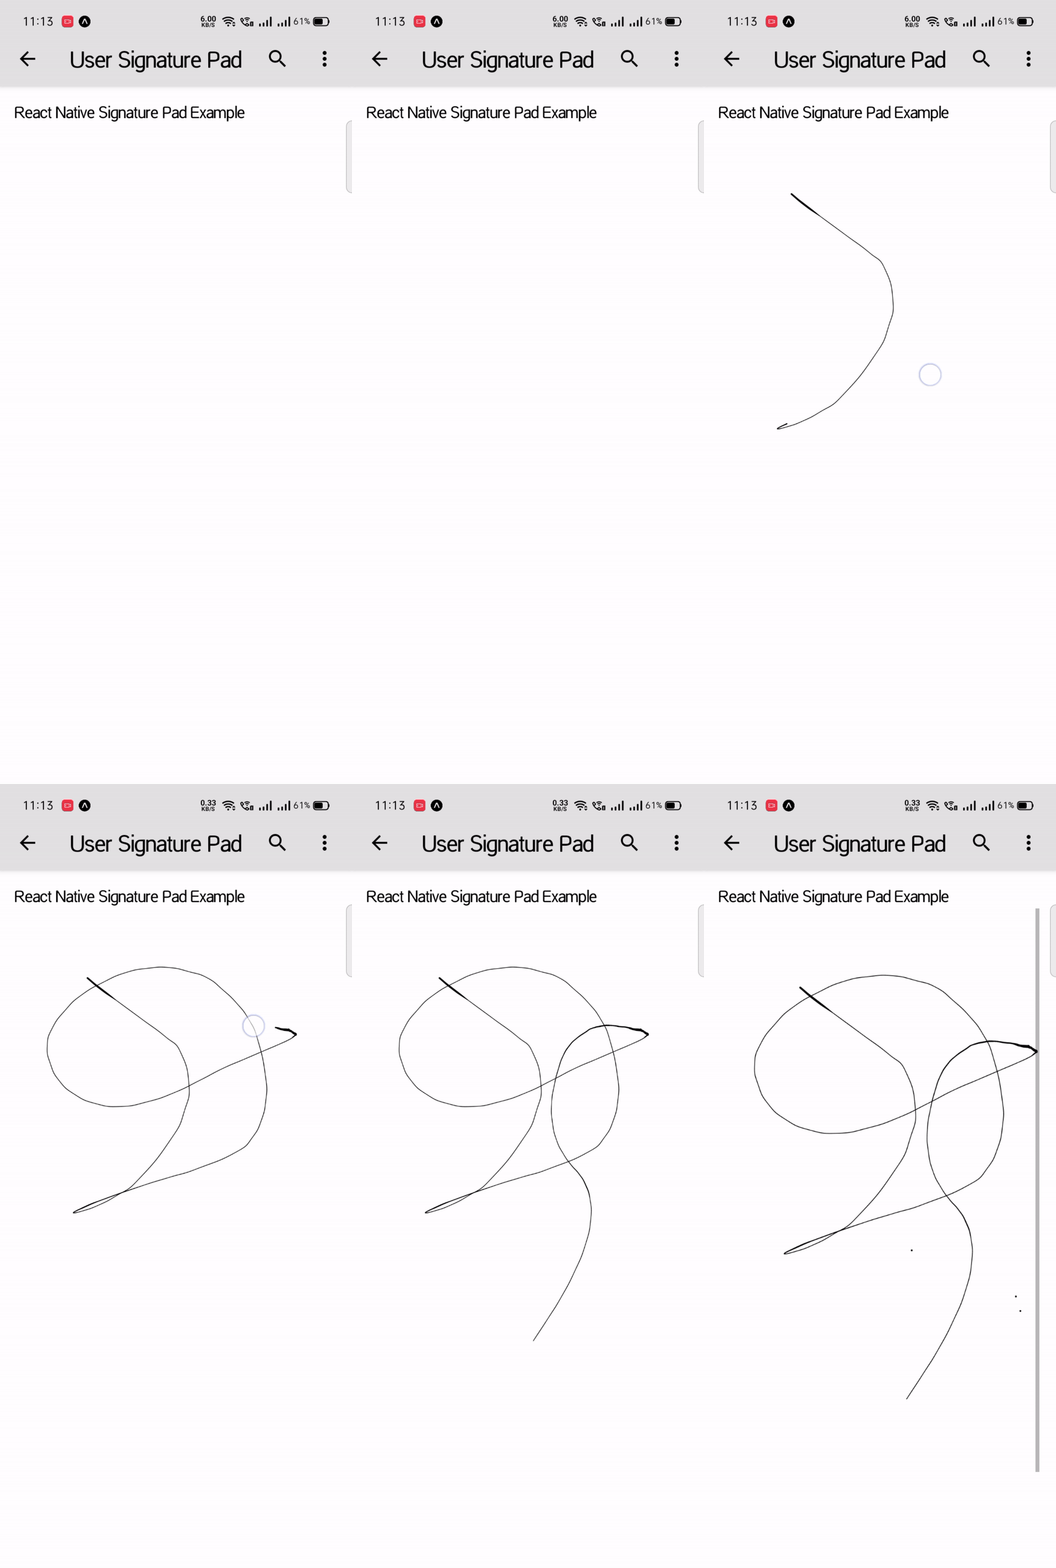
Today,I will learn you how to use signature pad in react native. We will show example of signature pad in react native. You can easliy create react native signature pad . First i will import SignaturePad namespace from react-native-signature-pad, after I will make signature pad using in react native.

Step 1 - Create project

In the first step Run the following command for create project.

expo init ITWebtuts 
Step 2 - Installation of Dependency

In the step, Run the following command for installation of dependency.

To use SignaturePad you need to install react-native-signature-pad package.

To install this open the terminal and jump into your project

cd paper ITWebtuts 
Run the following command
yarn add react-native-signature-pad
Next, I will in install react-native-paper for App bar.
yarn add react-native-paper
Step 3 - App.js

In this step, You will open App.js file and put the code.

import React, { Component } from "react";
import { Text, View,StyleSheet} from 'react-native';
import { Provider ,Appbar,Card,IconButton,Avatar} from 'react-native-paper';
import SignaturePad from 'react-native-signature-pad';

const ITWebtutsComponent = () => {

    const _goBack = () => console.log('Went back');

    const _handleSearch = () => console.log('Searching');

    const _handleMore = () => console.log('Shown more');

    const _signaturePadError = (error) => {
      console.error(error);
    };

    return (
    <Provider>
        <Appbar.Header style={styles.header}>
          <Appbar.BackAction onPress={_goBack} />
          <Appbar.Content title="User Signature Pad" />
          <Appbar.Action icon="magnify" onPress={_handleSearch} />
          <Appbar.Action icon="dots-vertical" onPress={_handleMore} />
        </Appbar.Header>
        <View style={styles.mainbox}>
          <Text>React Native Signature Pad Example</Text>
          <SignaturePad onError={() => _signaturePadError(this)}
                        style={{flex: 1, backgroundColor: 'white'}}/>
        </View>
    </Provider>
  );
};


const styles = StyleSheet.create({
    title:{
        margin: 10,
        fontSize: 15,
        fontSize: 35
    },
    mainbox:{
        textAlign:'center',
        margin: 15,
        flex: 1,
        justifyContent: 'space-between',
    },
    cardbox:{
        margin: 10,
    },
    header:{
        backgroundColor: '#e2e2e2',
    }
});
export default ITWebtutsComponent;
Step 3 - Run project

In the last step run your project using bellow command.

expo start
Output

It will help you...

Laravel Tailwind CSS Datepicker Tutorial

Laravel Tailwind CSS Datepicker

Hi Dev,

Today, I will show you how to use tailwind css datepicker in laravel. We will talk about laravel tailwind css datepicker example. In this article i will give simple datepicker using tailwind css in laravel.

Tailwind CSS is the only framework that I've seen scale on large teams. It’s easy to customize, adapts to any design, and the build size is tiny.

Tailwind is so low-level, it never encourages you to design the same site twice. Even with the same color palette and sizing scale, it's easy to build the same component with a completely different look in the next project.

Here I will give you full example for laravel tailwind css datepicker example so let;s see the bellow step by step:

Step 1: Install Laravel Project

First, you need to download the laravel fresh setup. Use this command then download laravel project setup :

composer create-project --prefer-dist laravel/laravel blog
Step 2: Install Tailwind CSS Via NPM

In this step, you need install tailwind css and tailwind css requires Node.js 12.13.0 or higher using bellow command so let's install the tailwind css.

npm install

Install Tailwind and its peer-dependencies using npm:

npm install -D tailwindcss@latest postcss@latest autoprefixer@latest
Create your configuration file

you can generate your tailwind.config.js file using bellow command:

npx tailwindcss init

This will create a minimal tailwind.config.js file at the root of your project or open this file and paste bellow code:

tailwind.config.js
module.exports = {
    purge: [
        './resources/**/*.blade.php',
        './resources/**/*.js',
        './resources/**/*.vue',
    ],
    darkMode: false, // or 'media' or 'class'
    theme: {
        extend: {},
    },
    variants: {
        extend: {},
    },
    plugins: [],
}
Step 3 : Configure Tailwind with Laravel Mix

In this step, you can configure tailwind with laravel mix and change in your webpack.mix.js, add tailwindcss as a PostCSS plugin:

mix.js("resources/js/app.js", "public/js")
    .postCss("resources/css/app.css", "public/css", [
     require("tailwindcss"),
]);
Step 4 : Include Tailwind in your CSS

Open the ./resources/css/app.css file that Laravel generates for you by default and use the @tailwind directive to include Tailwind's base, components, and utilities styles, replacing the original file contents:

resources/css/app.css
@tailwind base;
@tailwind components;
@tailwind utilities;
Step 5 : Add Route
<?php
use App\Http\Controllers\HomeController;

Route::get('/datepicker', [HomeController::class,'index']);
Step 6 : Create Controller

In this step, you can create new controller as HomeController so let's open terminal and bellow artisan command to create controller.

php artisan make:controller HomeController
app/Http/Controllers/HomeController.php
<?php

namespace App\Http\Controllers;

use Illuminate\Http\Request;
use Illuminate\Support\Facades\Route;

class HomeController extends Controller
{
    public function homePage()
    {
        return view('tailwind-datepicker');
    }
}
Step 7 : Create Blade File

In last step, You can create datepicker view as tailwind-datepicker.blade.php So let's create tailwind-datepicker.blade.php file and paste bellow code:

resources/views/tailwind-datepicker.blade.php
<!DOCTYPE html>
<html>
<head>
    <title>Laravel Tailwind CSS DatePicker Example</title>
    <meta charset="UTF-8" />
    <script type="text/javascript" src="{{ asset('js/app.js') }}"></script>
    <meta name="viewport" content="width=device-width, initial-scale=1.0" />
    <link href="{{ asset('css/app.css') }}" rel="stylesheet">
    <link rel="stylesheet" href="https://unpkg.com/tailwindcss@^1.0/dist/tailwind.min.css">
    <script src="https://ajax.googleapis.com/ajax/libs/jquery/3.5.1/jquery.min.js"></script>
    <script src="https://cdn.jsdelivr.net/gh/alpinejs/alpine@v2.x.x/dist/alpine.js" defer></script>
    <style>
        [x-cloak] {
            display: none;
        }
    </style>
</head>
<body>
    <div>
    </div>
    <div class="h-screen w-screen flex  justify-center bg-gray-200 py-5">
        <div class="antialiased sans-serif mt-5">
            <h1 class="font-bold text-gray-700 text-2xl mt-5">Laravel Tailwind CSS DatePicker Example</h1>
            <div x-data="app()" x-init="[initDate(), getNoOfDays()]" x-cloak>
                <div class="container mx-auto px-4 py-2 md:py-10">
                    <div class="mb-5 w-64">
                        <label for="datepicker" class="font-bold mb-1 text-gray-700 block">Select Date</label>
                        <div class="relative">
                            <input type="hidden" name="date" x-ref="date">
                            <input 
                                type="text"
                                readonly
                                x-model="datepickerValue"
                                @click="showDatepicker = !showDatepicker"
                                @keydown.escape="showDatepicker = false"
                                class="w-full pl-4 pr-10 py-3 leading-none rounded-lg shadow-sm focus:outline-none focus:shadow-outline text-gray-600 font-medium"
                                placeholder="Select date">

                            <div class="absolute top-0 right-0 px-3 py-2">
                                <svg class="h-6 w-6 text-gray-400"  fill="none" viewBox="0 0 24 24" stroke="currentColor">
                                    <path stroke-linecap="round" stroke-linejoin="round" stroke-width="2" d="M8 7V3m8 4V3m-9 8h10M5 21h14a2 2 0 002-2V7a2 2 0 00-2-2H5a2 2 0 00-2 2v12a2 2 0 002 2z"/>
                                </svg>
                            </div>
                            <div  class="bg-white mt-12 rounded-lg shadow p-4 absolute top-0 left-0" style="width: 17rem" x-show.transition="showDatepicker" @click.away="showDatepicker = false">
                                <div class="flex justify-between items-center mb-2">
                                    <div>
                                        <span x-text="MONTH_NAMES[month]" class="text-lg font-bold text-gray-800"></span>
                                        <span x-text="year" class="ml-1 text-lg text-gray-600 font-normal"></span>
                                    </div>
                                    <div>
                                        <button 
                                            type="button"
                                            class="transition ease-in-out duration-100 inline-flex cursor-pointer hover:bg-gray-200 p-1 rounded-full" 
                                            :class="{'cursor-not-allowed opacity-25': month == 0 }"
                                            :disabled="month == 0 ? true : false"
                                            @click="month--; getNoOfDays()">
                                            <svg class="h-6 w-6 text-gray-500 inline-flex"  fill="none" viewBox="0 0 24 24" stroke="currentColor">
                                                <path stroke-linecap="round" stroke-linejoin="round" stroke-width="2" d="M15 19l-7-7 7-7"/>
                                            </svg>  
                                        </button>
                                        <button 
                                            type="button"
                                            class="transition ease-in-out duration-100 inline-flex cursor-pointer hover:bg-gray-200 p-1 rounded-full" 
                                            :class="{'cursor-not-allowed opacity-25': month == 11 }"
                                            :disabled="month == 11 ? true : false"
                                            @click="month++; getNoOfDays()">
                                            <svg class="h-6 w-6 text-gray-500 inline-flex"  fill="none" viewBox="0 0 24 24" stroke="currentColor">
                                                <path stroke-linecap="round" stroke-linejoin="round" stroke-width="2" d="M9 5l7 7-7 7"/>
                                            </svg>                                      
                                        </button>
                                    </div>
                                </div>
                                <div class="flex flex-wrap mb-3 -mx-1">
                                    <template x-for="(day, index) in DAYS" :key="index">  
                                        <div style="width: 14.26%" class="px-1">
                                            <div
                                                x-text="day" 
                                                class="text-gray-800 font-medium text-center text-xs">
                                            </div>
                                        </div>
                                    </template>
                                </div>
                                <div class="flex flex-wrap -mx-1">
                                    <template x-for="blankday in blankdays">
                                        <div 
                                            style="width: 14.28%"
                                            class="text-center border p-1 border-transparent text-sm" 
                                        ></div>
                                    </template>   
                                    <template x-for="(date, dateIndex) in no_of_days" :key="dateIndex">   
                                        <div style="width: 14.28%" class="px-1 mb-1">
                                            <div
                                                @click="getDateValue(date)"
                                                x-text="date"
                                                class="cursor-pointer text-center text-sm leading-none rounded-full leading-loose transition ease-in-out duration-100"
                                                :class="{'bg-blue-500 text-white': isToday(date) == true, 'text-gray-700 hover:bg-blue-200': isToday(date) == false }"    
                                            ></div>
                                        </div>
                                    </template>
                                </div>
                            </div>
                        </div>     
                    </div>
                </div>
            </div>
        </div>
    </div>
    <script>
        const MONTH_NAMES = ['January', 'February', 'March', 'April', 'May', 'June', 'July', 'August', 'September', 'October', 'November', 'December'];
        const DAYS = ['Sun', 'Mon', 'Tue', 'Wed', 'Thu', 'Fri', 'Sat'];

        function app() {
            return {
                showDatepicker: false,
                datepickerValue: '',

                month: '',
                year: '',
                no_of_days: [],
                blankdays: [],
                days: ['Sun', 'Mon', 'Tue', 'Wed', 'Thu', 'Fri', 'Sat'],

                initDate() {
                    let today = new Date();
                    this.month = today.getMonth();
                    this.year = today.getFullYear();
                    this.datepickerValue = new Date(this.year, this.month, today.getDate()).toDateString();
                },
                isToday(date) {
                    const today = new Date();
                    const d = new Date(this.year, this.month, date);

                    return today.toDateString() === d.toDateString() ? true : false;
                },
                getDateValue(date) {
                    let selectedDate = new Date(this.year, this.month, date);
                    this.datepickerValue = selectedDate.toDateString();
                    this.$refs.date.value = selectedDate.getFullYear() +"-"+ ('0'+ selectedDate.getMonth()).slice(-2) +"-"+ ('0' + selectedDate.getDate()).slice(-2);
                    console.log(this.$refs.date.value);

                    this.showDatepicker = false;
                },

                getNoOfDays() {
                    let daysInMonth = new Date(this.year, this.month + 1, 0).getDate();

                    // find where to start calendar day of week
                    let dayOfWeek = new Date(this.year, this.month).getDay();
                    let blankdaysArray = [];
                    for ( var i=1; i <= dayOfWeek; i++) {
                        blankdaysArray.push(i);
                    }

                    let daysArray = [];
                    for ( var i=1; i <= daysInMonth; i++) {
                        daysArray.push(i);
                    }

                    this.blankdays = blankdaysArray;
                    this.no_of_days = daysArray;
                }
            }
        }
    </script>
</body>
</html>

Now we are ready to run our google recaptcha v3 example with laravel 8 so run bellow command for quick run:

php artisan serve

Now you can open bellow URL on your browser:

localhost:8000/datepicker

It will help you....

Laravel Image Text Watermarking Tutorial

Laravel Image Text Watermarking Tutorial

Hi dev,

Today i will learn to the how to create a watermarking image in laravel 8. This example is so easy to use in laravel.So, this example to i am used in 'intervention/image' package is used and create a watermarking image. So you can easily used and create watermarking image text in laravel 6, laravel 7 and laravel 8 version.

So let's start to the example and follow to the my all step.

Step 1: Ceate a laravel new project

First step to create a new laravel project in following command through.

composer create-project --prefer-dist laravel/laravel blog
Step 2: Install composer require package

Second step to install composer package('intervention/image') in just following command through.

composer require intervention/image
Step 3: Configure package

Third step to intervention/image package is installed then register to the package in your config/app.php file.

App/config.php
<?php
return [
    $providers => [
        ......,

        'Intervention\Image\ImageServiceProvider::class'
    ],

    $aliases => [
        ......,

        'Image' => 'Intervention\Image\Facades\Image::class'
    ]
]
Step 4: Create route

Fourth step to create a two routes in web.php file.

routes/web.php
<?php
  
use Illuminate\Support\Facades\Route;
  
use App\Http\Controllers\ImageFileController;
  
/*
|--------------------------------------------------------------------------
| Web Routes
|--------------------------------------------------------------------------
|
| Here is where you can register web routes for your application. These
| routes are loaded by the RouteServiceProvider within a group which
| contains the "web" middleware group. Now create something great!
|
*/
Route::get('file-upload', [ImageFileController::class, 'index']);
Route::post('add-watermark', [ImageFileController::class, 'imageFileUpload'])->name('image.watermark');
Step 5: Create controller

In this step to create a ImageFileController in just following command through. And then next write a code in store to image in your public directory.

php artisan make:controller ImageFileController
routes/web.php
<?php

namespace App\Http\Controllers;
use Illuminate\Http\Request;
use Image;

class ImageFileController extends Controller
{
    public function index()
    {
        return view('image');
    }
 
    public function imageFileUpload(Request $request)
    {
        $this->validate($request, [
            'file' => 'required|image|mimes:jpg,jpeg,png,gif,svg|max:4096',
        ]);

        $image = $request->file('file');
        $input['file'] = time().'.'.$image->getClientOriginalExtension();
        $imgFile = Image::make($image->getRealPath());
        $imgFile->text('© 2016-2020 positronX.io - All Rights Reserved', 120, 100, function($font) { 
            $font->size(35);  
            $font->color('#ffffff');  
            $font->align('center');  
            $font->valign('bottom');  
            $font->angle(90);  
        })->save(public_path('/uploads').'/'.$input['file']);          

        return back()
            ->with('success','File successfully uploaded.')
            ->with('fileName',$input['file']);         
    }
}
Step 6: Create blade file

Now last step to create a view file in image.blade.php in your view folder.

resources/views/image.blade.php
<!DOCTYPE html>
<html>
<head>
    <meta charset="utf-8">
    <meta name="viewport" content="width=device-width, initial-scale=1">
    <link href="https://cdn.jsdelivr.net/npm/bootstrap@5.0.0/dist/css/bootstrap.min.css" rel="stylesheet">
    <title>Laravel Image Text Watermarking Example</title>
</head>

<body>
    <div class="container mt-4" style="max-width: 600px">
        <h2 class="mb-5">Laravel Image Text Watermarking Example</h2>
        <form action="{{route('image.watermark')}}" enctype="multipart/form-data" method="post">
            @csrf
            @if ($message = Session::get('success'))
                <div class="alert alert-success">
                    <strong>{{ $message }}</strong>
                </div>

                <div class="col-md-12 mb-3 text-center">
                    <strong>Manipulated image:</strong><br />
                    <img src="/uploads/{{ Session::get('fileName') }}" width="600px"/>
                </div>
            @endif

            @if (count($errors) > 0)
                <div class="alert alert-danger">
                    <ul>
                        @foreach ($errors->all() as $error)
                        <li>{{ $error }}</li>
                        @endforeach
                    </ul>
                </div>
            @endif

            <div class="mb-3">
                <input type="file" name="file" class="form-control"  id="formFile">
            </div>
            <div class="d-grid mt-4">
                <button type="submit" name="submit" class="btn btn-primary">
                    Upload File
                </button>
            </div>
        </form>
    </div>
</body>
</html>

So, finally we are done with our code we can get below output.

php artisan serve
http://localhost:8000/file-uploads

It will help you...

Laravel Livewire Pagination Example

Laravel Livewire Pagination Example

Hii Dev,

Today, I will learn you how to add simple pagination livewire in laravel application. We will show simple pagination with data in laravel livewire. I would like share with you implement pagination livewire in laravel.

If you have to need show data with pagination in livewire then you can use bellow example. In this artical, I will learn you laravel livewire simple pagination. You can add pagination in table with data in livewire laravel at that time use bellow example.

Livewire is a full-stack framework for Laravel that makes building dynamic interfaces simple, without leaving the comfort of Laravel.Livewire relies solely on AJAX requests to do all its server communicaton.

Here I will give full example for load more data livewire in laravel,So Lets follow the bellow step.

Step 1 : Install Laravel App

In First step, We need to get fresh laravel version application using bellow command. So Let's open terminal and run bellow command.

composer create-project --prefer-dist laravel/laravel blog
Step 2 : Setup Database Configuration

After successfully install laravel app thenafter configure databse setup. We will open ".env" file and change the database name, username and password in the env file.

DB_CONNECTION=mysql
DB_HOST=127.0.0.1
DB_PORT=3306
DB_DATABASE=Enter_Your_Database_Name
DB_USERNAME=Enter_Your_Database_Username
DB_PASSWORD=Enter_Your_Database_Password
Step 3 : Install Livewire

In this step, You will simply install livewire to our laravel application using bellow command:

composer require livewire/livewire
Step 4 : Create Component

Now, You can create livewire component using bellow command, So Let's run bellow command to create user component:

php artisan make:livewire users

Now they created fies on both path:

app/Http/Livewire/Users.php
resources/views/livewire/users.blade.php

Now first file we will update as bellow for Users.php file.

app/Http/Livewire/Users.php
<?php

namespace App\Http\Livewire;

use Livewire\Component;
use App\User;

class Users extends Component
{
    public function render()
    {
        $users = User::latest()->paginate(5);
        return view('livewire.users-list',['users' => $users]);
    }
}
Step 5 : Add Route

Next, we need to add route for list users in laravel application. so open your "routes/web.php" file and add following route.

routes/web.php
Route::view('users','livewire.home');
Step 6 : Create View

Here, we will create blade file for show users list. in this file we will use @livewireStyles, @livewireScripts and @livewire('users'). so let's add it.

resources/views/livewire/users.blade.php
<div>
    <div class="table-responsive">
        <table class="table table-bordered">
            <thead>
                <tr>
                    <th>No.</th>
                    <th>Name</th>
                    <th>Email</th>
                </tr>
            </thead>
            <tbody>
                @foreach($users as $user)
                    <tr>
                        <td>{{ $user->id }}</td>
                        <td>{{ $user->name }}</td>
                        <td>{{ $user->email }}</td>
                    </tr>
                @endforeach
            </tbody>
        </table>
        {{ $users->links() }}
    </div>
</div>

resources/views/livewire/home.blade.php
<!DOCTYPE html>
<html>
<head>
    <title></title>
    <script src="{{ asset('js/app.js') }}" defer></script>
    <link href="{{ asset('css/app.css') }}" rel="stylesheet">
    @livewireStyles
</head>
<body>
    <div class="container">
        <div class="row justify-content-center">
            <div class="col-md-8">
                <div class="card">
                    <div class="card-header">
                        <h2>Laravel Livewire Simple Pagination Example</h2>
                    </div>
                    <div class="card-body">
                        @if (session()->has('message'))
                            <div class="alert alert-success">
                                {{ session('message') }}
                            </div>
                        @endif
                        @livewire('users')
                    </div>
                </div>
            </div>
        </div>
    </div>
    @livewireScripts
</body>
</html>

Now we are ready to run our example so run bellow command for quick run:

php artisan serve

Now you can open bellow URL on your browser:

http://localhost:8000/users

It will help you..

Laravel 8 Livewire Crud with Bootstrap Modal Tutorial

Laravel 8 Livewire Crud with Bootstrap Modal Tutorial

Hi Dev,

Today, I would like to share with you how perform crud opeartion with bootstrap modal livewire in laravel application.I will show you a complete step by step Laravel Livewire CRUD operation with modal.

Livewire is a full-stack framework for Laravel that makes building dynamic interfaces simple, without leaving the comfort of Laravel.Livewire relies solely on AJAX requests to do all its server communicaton.

Here I will give full example for crud opertaion livewire bootstrap modal in laravel,So Lets follow the bellow step.

Step 1 : Install Laravel App

Now In this First step, We need to get fresh laravel version application using bellow command. So Let's open terminal and run bellow command.

composer create-project --prefer-dist laravel/laravel blog
Step 2 : Setup Database Configuration

After successfully install laravel app thenafter configure databse setup. We will open ".env" file and change the database name, username and password in the env file.

DB_CONNECTION=mysql
DB_HOST=127.0.0.1
DB_PORT=3306
DB_DATABASE=Enter_Your_Database_Name
DB_USERNAME=Enter_Your_Database_Username
DB_PASSWORD=Enter_Your_Database_Password
Step 3 : Install Livewire

In this step, You will simply install livewire to our laravel application using bellow command:

composer require livewire/livewire
Step 4 : Create Component

Now, You can create livewire component using bellow command, So Let's run bellow command to create user form component:

php artisan make:livewire users

Now they created fies on both path:

app/Http/Livewire/Users.php
resources/views/livewire/users.blade.php

Now first file we will update as bellow for Users.php file.

app/Http/Livewire/Users.php
<?php

namespace App\Http\Livewire;

use Livewire\Component;
use App\Models\User;

class Users extends Component
{
    public $users, $name, $email, $user_id;
    public $updateMode = false;

    public function render()
    {
        $this->users = User::all();
        return view('livewire.users');
    }

    private function resetInputFields(){
        $this->name = '';
        $this->email = '';
    }

    public function store()
    {
        $validatedDate = $this->validate([
            'name' => 'required',
            'email' => 'required|email',
        ]);

        User::create($validatedDate);

        session()->flash('message', 'Users Created Successfully.');

        $this->resetInputFields();

        $this->emit('userStore'); // Close model to using to jquery

    }

    public function edit($id)
    {
        $this->updateMode = true;
        $user = User::where('id',$id)->first();
        $this->user_id = $id;
        $this->name = $user->name;
        $this->email = $user->email;
        
    }

    public function cancel()
    {
        $this->updateMode = false;
        $this->resetInputFields();


    }

    public function update()
    {
        $validatedDate = $this->validate([
            'name' => 'required',
            'email' => 'required|email',
        ]);

        if ($this->user_id) {
            $user = User::find($this->user_id);
            $user->update([
                'name' => $this->name,
                'email' => $this->email,
            ]);
            $this->updateMode = false;
            session()->flash('message', 'Users Updated Successfully.');
            $this->resetInputFields();

        }
    }

    public function delete($id)
    {
        if($id){
            User::where('id',$id)->delete();
            session()->flash('message', 'Users Deleted Successfully.');
        }
    }
}
Step 5 : Add Route

now, we need to add route for image form in laravel application. so open your "routes/web.php" file and add following route.

routes/web.php
Route::view('users','livewire.home');
Step 6 : Create View

Here, we will create blade file for call crud opertaion route. in this file we will use @livewireStyles, @livewireScripts and @livewire('users'). so let's add it.

resources/views/livewire/users.blade.php
<div>
    @include('livewire.create')
    @include('livewire.update')
    @if (session()->has('message'))
        <div class="alert alert-success" style="margin-top:30px;">x
          {{ session('message') }}
        </div>
    @endif
    <table class="table table-bordered mt-5">
        <thead>
            <tr>
                <th>No.</th>
                <th>Name</th>
                <th>Email</th>
                <th>Action</th>
            </tr>
        </thead>
        <tbody>
            @foreach($users as $value)
            <tr>
                <td>{{ $value->id }}</td>
                <td>{{ $value->name }}</td>
                <td>{{ $value->email }}</td>
                <td>
                <button data-toggle="modal" data-target="#updateModal" wire:click="edit({{ $value->id }})" class="btn btn-primary btn-sm">Edit</button>
                <button wire:click="delete({{ $value->id }})" class="btn btn-danger btn-sm">Delete</button>
                </td>
            </tr>
            @endforeach
        </tbody>
    </table>
</div>
resources/views/livewire/home.blade.php
<!DOCTYPE html>
<html>
<head>
    <title></title>
    <script src="{{ asset('js/app.js') }}" defer></script>
    <link href="{{ asset('css/app.css') }}" rel="stylesheet">
    @livewireStyles
</head>
<body>
    <div class="container">
        <div class="row justify-content-center">
            <div class="col-md-8">
                <div class="card">
                    <div class="card-header">
                        <h2>Laravel Livewire Modal Crud Example</h2>
                    </div>
                    <div class="card-body">
                        @if (session()->has('message'))
                            <div class="alert alert-success">
                                {{ session('message') }}
                            </div>
                        @endif
                        @livewire('users')
                    </div>
                </div>
            </div>
        </div>
    </div>
    @livewireScripts
    <script type="text/javascript">
        window.livewire.on('userStore', () => {
            $('#exampleModal').modal('hide');
        });
    </script>
</body>
</html>
resources/views/livewire/create.blade.php
<button type="button" class="btn btn-primary" data-toggle="modal" data-target="#exampleModal">
	Open Form
</button>

<!-- Modal -->
<div wire:ignore.self class="modal fade" id="exampleModal" tabindex="-1" role="dialog" aria-labelledby="exampleModalLabel" aria-hidden="true">
    <div class="modal-dialog" role="document">
        <div class="modal-content">
            <div class="modal-header">
                <h5 class="modal-title" id="exampleModalLabel">Modal title</h5>
                <button type="button" class="close" data-dismiss="modal" aria-label="Close">
                     <span aria-hidden="true close-btn">×</span>
                </button>
            </div>
           <div class="modal-body">
                <form>
                    <div class="form-group">
                        <label for="exampleFormControlInput1">Name</label>
                        <input type="text" class="form-control" id="exampleFormControlInput1" placeholder="Enter Name" wire:model="name">
                        @error('name') <span class="text-danger error">{{ $message }}</span>@enderror
                    </div>
                    <div class="form-group">
                        <label for="exampleFormControlInput2">Email address</label>
                        <input type="email" class="form-control" id="exampleFormControlInput2" wire:model="email" placeholder="Enter Email">
                        @error('email') <span class="text-danger error">{{ $message }}</span>@enderror
                    </div>
                </form>
            </div>
            <div class="modal-footer">
                <button type="button" class="btn btn-secondary close-btn" data-dismiss="modal">Close</button>
                <button type="button" wire:click.prevent="store()" class="btn btn-primary close-modal">Save changes</button>
            </div>
        </div>
    </div>
</div>
resources/views/livewire/update.blade.php
<!-- Modal -->
<div wire:ignore.self class="modal fade" id="updateModal" tabindex="-1" role="dialog" aria-labelledby="exampleModalLabel" aria-hidden="true">
    <div class="modal-dialog" role="document">
       <div class="modal-content">
            <div class="modal-header">
                <h5 class="modal-title" id="exampleModalLabel">Modal title</h5>
                <button type="button" class="close" data-dismiss="modal" aria-label="Close">
                    <span aria-hidden="true">×</span>
                </button>
            </div>
            <div class="modal-body">
                <form>
                    <div class="form-group">
                        <input type="hidden" wire:model="user_id">
                        <label for="exampleFormControlInput1">Name</label>
                        <input type="text" class="form-control" wire:model="name" id="exampleFormControlInput1" placeholder="Enter Name">
                        @error('name') <span class="text-danger">{{ $message }}</span>@enderror
                    </div>
                    <div class="form-group">
                        <label for="exampleFormControlInput2">Email address</label>
                        <input type="email" class="form-control" wire:model="email" id="exampleFormControlInput2" placeholder="Enter Email">
                        @error('email') <span class="text-danger">{{ $message }}</span>@enderror
                    </div>
                </form>
            </div>
            <div class="modal-footer">
                <button type="button" wire:click.prevent="cancel()" class="btn btn-secondary" data-dismiss="modal">Close</button>
                <button type="button" wire:click.prevent="update()" class="btn btn-primary" data-dismiss="modal">Save changes</button>
            </div>
       </div>
    </div>
</div>

Now we are ready to run our example so run bellow command for quick run:

php artisan serve

Now you can open bellow URL on your browser:

http://localhost:8000/users

It will help you..

Laravel 8 Jetstream Livewire CRUD App Tutorial

Laravel 8 Jetstream Livewire CRUD App Tutorial

Hello Guys,

In this blog, I will learn you livewire crud with jetstream in laravel 8 application. We will learn laravel 8 jetstream livewire crud app example. I would like to share with you how perform crud opeartion livewire with jetstream in laravel 8 application.

This blog will give you easy and simple example of laravel 8 jetstream livewire crud app example. In this example i will show you step by step laravel 8 livewire crud app with modal tailwind css.

Laravel 8 jetstream designed by Tailwind CSS and they provide auth using livewire and Inertia. i will show you how to create module with livewire on default jetstream auth in laravel 8.

Here i will give you full example for laravel 8 jetstream livewire crud app example. So let's follow bellow step by step:

Step 1 : Install Laravel 8 App

In First step, We need to get fresh laravel version application using bellow command. So Let's open terminal and run bellow command.

composer create-project --prefer-dist laravel/laravel blog
Step 2 : Create Jetstream Auth with Livewire:

Now, you can install jetstream using bellow command so lets open terminal and run bellow command:

composer require laravel/jetstream

Now we need to create authentication using bellow command you can create basic login, register and email verification. if you want to create team management then you have to pass addition parameter. you can see bellow commands:

php artisan jetstream:install livewire

Now, let's node js package:

npm install

let's run package:

npm run dev

Now, we have to need migration so let's bellow artisan command to migrate database:

php artisan migrate
Step 3 : Create Migration and Model

In this step, We have to create migration for blogs table using bellow artisan command. So let's open terminal and run bello command :

php artisan make:migration create_blogs_table
database/migrations/2020_09_26_044246_create_blogs_table.php
<?php

use Illuminate\Database\Migrations\Migration;
use Illuminate\Database\Schema\Blueprint;
use Illuminate\Support\Facades\Schema;

class CreateBlogsTable extends Migration
{
    /**
     * Run the migrations.
     *
     * @return void
     */
    public function up()
    {
        Schema::create('blogs', function (Blueprint $table) {
            $table->id();
            $table->string('title');
            $table->text('body');
            $table->timestamps();
        });
    }

    /**
     * Reverse the migrations.
     *
     * @return void
     */
    public function down()
    {
        Schema::dropIfExists('blogs');
    }
}
php artisan migrate

now we will create Blog model by using following command:

php artisan make:model Blog
App/Models/Blog.php
<?php

namespace App\Models;

use Illuminate\Database\Eloquent\Factories\HasFactory;
use Illuminate\Database\Eloquent\Model;

class Blog extends Model
{
    use HasFactory;

    /**
     * The attributes that are mass assignable.
     *
     * @var array
    */
    protected $fillable = [
        'title', 'body',
    ];
}
Step 4 : Create Blog Component

Here this step, We have to create blog livewire component using bellow command. So let's open terminal and run bello command :

php artisan make:livewire blogs

Now they created fies on both path:

app/Http/Livewire/Blogs.php
resources/views/livewire/blogs.blade.php
Step 5 : Update Component File

Here We will write render(), create(), openModal(), closeModal(), resetInputFields(), store(), edit() and delete() method for our crud app.

So, let, update following file.

app/Http/Livewire/Blogs.php
<?php

namespace App\Http\Livewire;

use Livewire\Component;
use App\Models\Blog;

class Blogs extends Component
{
   public $blogs, $title, $body, $blog_id;
    public $isOpen = 0;
  
    /**
     * The attributes that are mass assignable.
     *
     * @var array
     */
    public function render()
    {
        $this->blogs = Blog::all();
        return view('livewire.blogs');
    }
  
    /**
     * The attributes that are mass assignable.
     *
     * @var array
     */
    public function create()
    {
        $this->resetInputFields();
        $this->openModal();
    }
  
    /**
     * The attributes that are mass assignable.
     *
     * @var array
     */
    public function openModal()
    {
        $this->isOpen = true;
    }
  
    /**
     * The attributes that are mass assignable.
     *
     * @var array
     */
    public function closeModal()
    {
        $this->isOpen = false;
    }
  
    /**
     * The attributes that are mass assignable.
     *
     * @var array
     */
    private function resetInputFields(){
        $this->title = '';
        $this->body = '';
        $this->blog_id = '';
    }
     
    /**
     * The attributes that are mass assignable.
     *
     * @var array
     */
    public function store()
    {
        $this->validate([
            'title' => 'required',
            'body' => 'required',
        ]);
   
        Blog::updateOrCreate(['id' => $this->blog_id], [
            'title' => $this->title,
            'body' => $this->body
        ]);
  
        session()->flash('message', 
            $this->blog_id ? 'Blog Updated Successfully.' : 'Blog Created Successfully.');
  
        $this->closeModal();
        $this->resetInputFields();
    }
    /**
     * The attributes that are mass assignable.
     *
     * @var array
     */
    public function edit($id)
    {
        $blog = Blog::findOrFail($id);
        $this->blog_id = $id;
        $this->title = $blog->title;
        $this->body = $blog->body;
    
        $this->openModal();
    }
     
    /**
     * The attributes that are mass assignable.
     *
     * @var array
     */
    public function delete($id)
    {
        Blog::find($id)->delete();
        session()->flash('message', 'Blog Deleted Successfully.');
    }
}
Step 6 : Update Blade Files

Here, we will update following list of files for our listing page, create page.

So, let, update following file.

resources/views/livewire/blogs.blade.php
<x-slot name="header">
    <h2 class="font-semibold text-xl text-gray-800 leading-tight">
        Manage blogs (Laravel 8 Jetstream Livewire CRUD App Example)
    </h2>
</x-slot>
<div class="py-12">
    <div class="max-w-7xl mx-auto sm:px-6 lg:px-8">
        <div class="bg-white overflow-hidden shadow-xl sm:rounded-lg px-4 py-4">
            @if (session()->has('message'))
                <div class="bg-teal-100 border-t-4 border-teal-500 rounded-b text-teal-900 px-4 py-3 shadow-md my-3" role="alert">
                  <div class="flex">
                    <div>
                      <p class="text-sm">{{ session('message') }}</p>
                    </div>
                  </div>
                </div>
            @endif
            <button wire:click="create()" class="bg-blue-500 hover:bg-blue-700 text-white font-bold py-2 px-4 rounded my-3">Create New Blog</button>
            @if($isOpen)
                @include('livewire.create')
            @endif
            <table class="table-fixed w-full">
                <thead>
                    <tr class="bg-gray-100">
                        <th class="px-4 py-2 w-20">No.</th>
                        <th class="px-4 py-2">Title</th>
                        <th class="px-4 py-2">Body</th>
                        <th class="px-4 py-2">Action</th>
                    </tr>
                </thead>
                <tbody>
                    @foreach($blogs as $blog)
                    <tr>
                        <td class="border px-4 py-2">{{ $blog->id }}</td>
                        <td class="border px-4 py-2">{{ $blog->title }}</td>
                        <td class="border px-4 py-2">{{ $blog->body }}</td>
                        <td class="border px-4 py-2">
                        <button wire:click="edit({{ $blog->id }})" class="bg-blue-500 hover:bg-blue-700 text-white font-bold py-2 px-4 rounded">Edit</button>
                            <button wire:click="delete({{ $blog->id }})" class="bg-red-500 hover:bg-red-700 text-white font-bold py-2 px-4 rounded">Delete</button>
                        </td>
                    </tr>
                    @endforeach
                </tbody>
            </table>
        </div>
    </div>
</div>
resources/views/livewire/create.blade.php
<div class="fixed z-10 inset-0 overflow-y-auto ease-out duration-400">
    <div class="flex items-end justify-center min-h-screen pt-4 px-4 pb-20 text-center sm:block sm:p-0">
        <div class="fixed inset-0 transition-opacity">
            <div class="absolute inset-0 bg-gray-500 opacity-75"></div>
        </div>
        <!-- This element is to trick the browser into centering the modal contents. -->
        <span class="hidden sm:inline-block sm:align-middle sm:h-screen"></span>?
        <div class="inline-block align-bottom bg-white rounded-lg text-left overflow-hidden shadow-xl transform transition-all sm:my-8 sm:align-middle sm:max-w-lg sm:w-full" role="dialog" aria-modal="true" aria-labelledby="modal-headline">
            <form>
                <div class="bg-white px-4 pt-5 pb-4 sm:p-6 sm:pb-4">
                    <div class="">
                        <div class="mb-4">
                            <label for="exampleFormControlInput1" class="block text-gray-700 text-sm font-bold mb-2">Title:</label>
                            <input type="text" class="shadow appearance-none border rounded w-full py-2 px-3 text-gray-700 leading-tight focus:outline-none focus:shadow-outline" id="exampleFormControlInput1" placeholder="Enter Title" wire:model="title">
                            @error('title') <span class="text-red-500">{{ $message }}</span>@enderror
                        </div>
                        <div class="mb-4">
                            <label for="exampleFormControlInput2" class="block text-gray-700 text-sm font-bold mb-2">Body:</label>
                            <textarea class="shadow appearance-none border rounded w-full py-2 px-3 text-gray-700 leading-tight focus:outline-none focus:shadow-outline" id="exampleFormControlInput2" wire:model="body" placeholder="Enter Body"></textarea>
                            @error('body') <span class="text-red-500">{{ $message }}</span>@enderror
                        </div>
                    </div>
                </div>
                <div class="bg-gray-50 px-4 py-3 sm:px-6 sm:flex sm:flex-row-reverse">
                    <span class="flex w-full rounded-md shadow-sm sm:ml-3 sm:w-auto">
                        <button wire:click.prevent="store()" type="button" class="inline-flex justify-center w-full rounded-md border border-transparent px-4 py-2 bg-green-600 text-base leading-6 font-medium text-white shadow-sm hover:bg-green-500 focus:outline-none focus:border-green-700 focus:shadow-outline-green transition ease-in-out duration-150 sm:text-sm sm:leading-5">
                        Save
                        </button>
                    </span>
                    <span class="mt-3 flex w-full rounded-md shadow-sm sm:mt-0 sm:w-auto">
                        <button wire:click="closeModal()" type="button" class="inline-flex justify-center w-full rounded-md border border-gray-300 px-4 py-2 bg-white text-base leading-6 font-medium text-gray-700 shadow-sm hover:text-gray-500 focus:outline-none focus:border-blue-300 focus:shadow-outline-blue transition ease-in-out duration-150 sm:text-sm sm:leading-5">
                            Cancel
                        </button>
                    </span>
                </div>
            </form>
        </div>
    </div>
</div>
Step 7 : Add Route

In third step, we will create routes for jetstream crud with livewire .

routes/web.php
<?php
use App\Http\Livewire\Blogs;

Route::get('blog', Blogs::class);

Now we are ready to run our laravel 8 jetstream livewire crud app example so run bellow command for quick run:

php artisan serve

Now you can open bellow URL on your browser:

localhost:8000/blog

It will help you...

Laravel Jetstream Login with Phone Number and Password Example

Laravel Jetstream Login with Phone Number and Password Example

Hii Dev,

This article will provide example of laravel jetstream login with phone number. This article goes in detailed on login with mobile number and password in laravel jetstream. In this article, we will implement a laravel jetstream login with mobile number. i would like to share with you laravel jetstream login with phone number example.

I will give you step by step adding login with phone number in laravel jetstream. you can easily integrate with laravel 6, laravel 7 and laravel 8 version.

after installing laravel jetstream successfully. you need to do following changes on that files:

app/Providers/FortifyServiceProvider.php
<?php
  
namespace App\Providers;
  
use App\Actions\Fortify\CreateNewUser;
use App\Actions\Fortify\ResetUserPassword;
use App\Actions\Fortify\UpdateUserPassword;
use App\Actions\Fortify\UpdateUserProfileInformation;
use Illuminate\Support\ServiceProvider;
use Laravel\Fortify\Fortify;
use Laravel\Fortify\Http\Requests\LoginRequest;
use App\Models\User;
use Hash;
  
class FortifyServiceProvider extends ServiceProvider
{
    /**
     * Register any application services.
     *
     * @return void
     */
    public function register()
    {
          
    }
    /**
     * Bootstrap any application services.
     *
     * @return void
     */
    public function boot()
    {
        Fortify::createUsersUsing(CreateNewUser::class);
        Fortify::updateUserProfileInformationUsing(UpdateUserProfileInformation::class);
        Fortify::updateUserPasswordsUsing(UpdateUserPassword::class);
        Fortify::resetUserPasswordsUsing(ResetUserPassword::class);
  
        Fortify::authenticateUsing(function (LoginRequest $request) {
            $user = User::where('phone_number', $request->phone_number)->first();
  
            if (
                $user &&
                Hash::check($request->password, $user->password)
            ) {
                return $user;
            }
        });
    }
}
config/fortify.php
'username' => 'phone_number',
resources/views/auth/login.blade.php
<x-guest-layout>
    <x-jet-authentication-card>
        <x-slot name="logo">
            <x-jet-authentication-card-logo />
        </x-slot>
  
        <x-jet-validation-errors class="mb-4" />
  
        @if (session('status'))
            <div class="mb-4 font-medium text-sm text-green-600">
                {{ session('status') }}
            </div>
        @endif
  
        <form method="POST" action="{{ route('login') }}">
            @csrf
  
            <div>
                <x-jet-label value="{{ __('Phone Number') }}" />
                <x-jet-input class="block mt-1 w-full" type="text" name="phone_number" :value="old('phone_number')" required autofocus />
            </div>
  
            <div class="mt-4">
                <x-jet-label value="{{ __('Password') }}" />
                <x-jet-input class="block mt-1 w-full" type="password" name="password" required autocomplete="current-password" />
            </div>
  
            <div class="block mt-4">
                <label class="flex items-center">
                    <input type="checkbox" class="form-checkbox" name="remember">
                    <span class="ml-2 text-sm text-gray-600">{{ __('Remember me') }}</span>
                </label>
            </div>
  
            <div class="flex items-center justify-end mt-4">
                @if (Route::has('password.request'))
                    <a class="underline text-sm text-gray-600 hover:text-gray-900" href="{{ route('password.request') }}">
                        {{ __('Forgot your password?') }}
                    </a>
                @endif
 
                <x-jet-button class="ml-4">
                    {{ __('Login') }}
                </x-jet-button>
            </div>
        </form>
    </x-jet-authentication-card>
</x-guest-layout>

It will help you....

Laravel Call Controller Method From Another Method Example

Laravel Call Controller Method From Another Method Example

Hi Dev,

Today,I will learn you how to call controller method from another method in laravel. I will show example of laravel call controller method from another method.you can easliy call controller method from another method in laravel.

I will describe step by step laravel call controller method from another method example.

Step 1: Create Route

In this setp,I will create route for a call controller method from another method in laravel.

<?php
use App\Http\Controllers\UserController;
/*
|--------------------------------------------------------------------------
| Web Routes
|--------------------------------------------------------------------------
|
| Here is where you can register web routes for your application. These
| routes are loaded by the RouteServiceProvider within a group which
| contains the "web" middleware group. Now create something great!
|
*/
Route::get('/home', [UserController::class,'index'])->name('home');
Step 2: Create Controller

In this setp, I will create two controller using terminal/cmd. I will create UserController and AdminController.

php artisan make:UserController
and
php artisan make:AdminController
Step 3:User Controller

In this setp, i will writer code of call controller method from another method.

<?php

namespace App\Http\Controllers;

use Illuminate\Http\Request;
use App\Http\Controllers\AdminController;

class UserController extends Controller
{
    /**
     * Show the application dashboard.
     *
     * @return \Illuminate\Contracts\Support\Renderable
     */
    public function index()
    {
    	$id = 1;

        $result = (new AdminController)->index($id);

        return view('home',compact('result'));
    }
}

Step 4:Admin Controller

In this setp, i will create method in admin controller for code of call controller method from another method.

<?php

namespace App\Http\Controllers;

use Illuminate\Http\Request;
use App\Admin;

class AdminController extends Controller
{
    public function index($id)
    {
        dd('This is AdminController Index Method Id='.$id);
    }
}

OutPut
"This is AdminController Index Method And Id=1"
It will help you....

Laravel Livewire Select2 Multiple Tutorial

Laravel Livewire Select2 Multiple Tutorial

Hi Dev,

Today, I would like to share with you how to inetegrate select2 livewire in laravel application.I will show you a complete example for select2 multiple example with laravel livewire.

Livewire is a full-stack framework for Laravel that makes building dynamic interfaces simple, without leaving the comfort of Laravel.Livewire relies solely on AJAX requests to do all its server communicaton.

Here I will give full example for select2 in laravel livewire,So Lets follow the bellow step.

Step 1 : Install Laravel App

In First step, We need to get fresh laravel version application using bellow command. So Let's open terminal and run bellow command.

composer create-project --prefer-dist laravel/laravel blog
Step 2 : Setup Database Configuration

After successfully install laravel app thenafter configure databse setup. We will open ".env" file and change the database name, username and password in the env file.

DB_CONNECTION=mysql
DB_HOST=127.0.0.1
DB_PORT=3306
DB_DATABASE=Enter_Your_Database_Name
DB_USERNAME=Enter_Your_Database_Username
DB_PASSWORD=Enter_Your_Database_Password
Step 3 : Install Livewire

In this step, You will simply install livewire to our laravel application using bellow command:

composer require livewire/livewire
Step 4 : Create Post Table

In this step, We have to create migration for products table using bellow artisan command. So let's open terminal and run bello command :

php artisan make:model Product -m
database/migrations/2021_06_05_044246_create_products_table.php
<?php

use Illuminate\Database\Migrations\Migration;
use Illuminate\Database\Schema\Blueprint;
use Illuminate\Support\Facades\Schema;

class CreateProductsTable extends Migration
{
    /**
     * Run the migrations.
     *
     * @return void
     */
    public function up()
    {
        Schema::create('products', function (Blueprint $table) {
            $table->id();
            $table->string('name');
            $table->string('category');
            $table->timestamps();
        });
    }

    /**
     * Reverse the migrations.
     *
     * @return void
     */
    public function down()
    {
        Schema::dropIfExists('products');
    }
}
App/Models/Product.php
<?php

namespace App\Models;

use Illuminate\Database\Eloquent\Factories\HasFactory;
use Illuminate\Database\Eloquent\Model;

class Product extends Model
{
    use HasFactory;
    protected $fillable = ['name','category'];
}
Step 5 : Create Component

Now, You can create livewire component using bellow command, So Let's run bellow command to create Select2 form component:

php artisan make:livewire Select2

Now they created fies on both path:

app/Http/Livewire/Select2.php
resources/views/livewire/select2.blade.php

Now first file we will update as bellow for Select2.php file.

app/Http/Livewire/Select2.php
<?php

namespace App\Http\Livewire;

use Livewire\Component;
use App\Models\Product;

class Select2 extends Component
{
    public $productList = [
        'Fruit',
        'Vegetable',
        'Chocolate',
        'Egg',
        'Fish',
        'Chemical',
        'Dairy Product',
    ];

    public $name,$category = [];

    public function render()
    {
        return view('livewire.select2');
    }

    public function store()
    {
        $input = [
            'name' => $this->name,
            'category' => json_encode($this->category),
        ];
        Product::create($input);
        $this->name = '';
        $this->category = '';
        $this->emit('productStore');
    }
}
Step 6 : Add Route

Now, we need to add route for create select2 dropdown and create product in laravel application. so open your "routes/web.php" file and add following route.

routes/web.php
Route::view('select2','livewire.home');
Step 8 : Create View

Here, we will create blade file for call route. in this file we will use @livewireStyles, @livewireScripts and @livewire('posts'). so let's add it.

resources/views/livewire/home.blade.php
<!DOCTYPE html>
<html>
<head>
    <title>Laravel Livewire Select2 Multiple Example</title>
    <script src="https://cdnjs.cloudflare.com/ajax/libs/jquery/3.6.0/jquery.min.js" integrity="sha512-894YE6QWD5I59HgZOGReFYm4dnWc1Qt5NtvYSaNcOP+u1T9qYdvdihz0PPSiiqn/+/3e7Jo4EaG7TubfWGUrMQ==" crossorigin="anonymous" referrerpolicy="no-referrer"></script>
    <link rel="stylesheet" href="https://cdnjs.cloudflare.com/ajax/libs/font-awesome/5.15.3/css/all.min.css" integrity="sha512-iBBXm8fW90+nuLcSKlbmrPcLa0OT92xO1BIsZ+ywDWZCvqsWgccV3gFoRBv0z+8dLJgyAHIhR35VZc2oM/gI1w==" crossorigin="anonymous" referrerpolicy="no-referrer" />
    <script src="https://cdnjs.cloudflare.com/ajax/libs/twitter-bootstrap/4.6.0/js/bootstrap.min.js" integrity="sha512-XKa9Hemdy1Ui3KSGgJdgMyYlUg1gM+QhL6cnlyTe2qzMCYm4nAZ1PsVerQzTTXzonUR+dmswHqgJPuwCq1MaAg==" crossorigin="anonymous" referrerpolicy="no-referrer"></script>
    <link rel="stylesheet" href="https://cdnjs.cloudflare.com/ajax/libs/twitter-bootstrap/4.6.0/css/bootstrap.min.css" integrity="sha512-P5MgMn1jBN01asBgU0z60Qk4QxiXo86+wlFahKrsQf37c9cro517WzVSPPV1tDKzhku2iJ2FVgL67wG03SGnNA==" crossorigin="anonymous" referrerpolicy="no-referrer" />
    <script src="https://cdnjs.cloudflare.com/ajax/libs/select2/4.0.13/js/select2.min.js" integrity="sha512-2ImtlRlf2VVmiGZsjm9bEyhjGW4dU7B6TNwh/hx/iSByxNENtj3WVE6o/9Lj4TJeVXPi4bnOIMXFIJJAeufa0A==" crossorigin="anonymous" referrerpolicy="no-referrer"></script>
    <link rel="stylesheet" href="https://cdnjs.cloudflare.com/ajax/libs/select2/4.0.13/css/select2.min.css" integrity="sha512-nMNlpuaDPrqlEls3IX/Q56H36qvBASwb3ipuo3MxeWbsQB1881ox0cRv7UPTgBlriqoynt35KjEwgGUeUXIPnw==" crossorigin="anonymous" referrerpolicy="no-referrer" />
    @livewireStyles
</head>
<body>
    <div class="container mt-5">
        <div class="row justify-content-center mt-5">
            <div class="col-md-8 mt-5">
                <div class="card">
                    <div class="card-header bg-info text-white">
                        <h4>Laravel Livewire Select2 Multiple Example </h4>
                    </div>
                    <div class="card-body">
                        @if (session()->has('message'))
                            <div class="alert alert-success">
                                {{ session('message') }}
                            </div>
                        @endif
                        @livewire('select2')
                    </div>
                </div>
            </div>
        </div>
    </div>
    @livewireScripts
    @stack('scripts')
</body>
</html>
resources/views/livewire/select2.blade.php
<div>
    <form wire:submit.prevent="store">
        <div class="row">
            <div class="col-md-12">
                <div class="form-group">
                    <label>Name</label>
                    <input type="text" wire:model="name" class="form-control">
                </div>
            </div>
            <div class="col-md-12">
                <div class="form-group">
                    <label>Category</label>
                    <div wire:ignore>
                        <select id="category-dropdown" class="form-control" multiple wire:model="category">
                            @foreach($productList as $product)
                                <option value="{{$product}}">{{ $product }}</option>
                            @endforeach
                        </select>
                    </div>
                </div>
            </div>
            <div class="col-md-12 text-center">
                <button type="submit" class="btn btn-success">Save</button>
            </div>
        </div>
    </form>
</div>
@push('scripts')
    <script>
        $(document).ready(function () {
            $('#category-dropdown').select2();
            $('#category-dropdown').on('change', function (e) {
                let data = $(this).val();
                 @this.set('category', data);
            });
            window.livewire.on('productStore', () => {
                $('#category-dropdown').select2();
            });
        });  
    </script>
@endpush
Now we are ready to run our example so run bellow command for quick run:
php artisan serve

Now you can open bellow URL on your browser:

http://localhost:8000/select2

It will help you..