Laravel 9 Yajra Datatables Example

Laravel 9 Yajra Datatables Tutorial

Hi Dev,

Today, This blog will provide some of the most important how to use yajra data tables in laravel 9?. The complete step by step guide of laravel 9 yajra datatables example. This Laravel 9 tutorial help to implement yajra data table with laravel 9. i will give you simple example of yajra data tables with ajax in laravel 9. In this example of how to use bootstrap data tables in laravel 9. Yajra DataTables is a jQuery plug-in which is helps us in Laravel for more functionalities like searching, sorting, pagination on tables. If you search how to use yajra data tables in laravel then here in this example is perfect implement from scratch. You have to just follow a few steps for implement data tables in your laravel application. let's start to use data tables in laravel application. Step 1: Install Laravel 9 This step is not required; however, if you have not created the laravel app, then you may go ahead and execute the below command:
composer create-project laravel/laravel laravel-yajra-table
Step 2: Install Yajra Datatable In this step we need to install yajra datatable via the Composer package manager, so one your terminal and fire bellow command:
composer require yajra/laravel-datatables-oracle
Step 3: Add Dummy Users In this step, we will create some dummy users using tinker factory. so let's create dummy records using bellow command:
php artisan tinker
  
User::factory()->count(20)->create()
Step 4: Create Controller In this point, now we should create new controller as UserController. this controller will manage layout and getting data request and return response, so put bellow content in controller file: app/Http/Controllers/UserController.php
<?php

namespace App\Http\Controllers;

use Illuminate\Http\Request;
use App\Models\User;
use DataTables;

class UserController extends Controller
{
    /**
     * Display a listing of the resource.
     *
     * @return \Illuminate\Http\Response
     */
    public function index(Request $request)
    {
        if ($request->ajax()) {
            $data = User::select('*');
            return Datatables::of($data)
                    ->addIndexColumn()
                    ->addColumn('action', function($row){
       
                            $btn = '<a href="javascript:void(0)" class="edit btn btn-success btn-sm text-center">View</a>';
      
                            return $btn;
                    })
                    ->rawColumns(['action'])
                    ->make(true);
        }
          
        return view('users');
    }
}
Step 5: Add Route In this is step we need to create route for datatables layout file and another one for getting data. so open your "routes/web.php" file and add following route. routes/web.php
<?php
  
use Illuminate\Support\Facades\Route;
  
use App\Http\Controllers\UserController;
  
/*
|--------------------------------------------------------------------------
| Web Routes
|--------------------------------------------------------------------------
|
| Here is where you can register web routes for your application. These
| routes are loaded by the RouteServiceProvider within a group which
| contains the "web" middleware group. Now create something great!
|
*/
  
Route::get('users', [UserController::class, 'index'])->name('users.index');
Step 6: Create Blade File In Last step, let's create users.blade.php(resources/views/users.blade.php) for layout and we will write design code here and put following code: resources/views/users.blade.php
<!DOCTYPE html>
<html>
<head>
    <title> laravel 9 yajra datatables example - Itwebtuts </title>
    <meta name="csrf-token" content="{{ csrf_token() }}">
    <link href="https://cdnjs.cloudflare.com/ajax/libs/twitter-bootstrap/5.0.1/css/bootstrap.min.css" rel="stylesheet">
    <link href="https://cdn.datatables.net/1.11.4/css/dataTables.bootstrap5.min.css" rel="stylesheet">
    <script src="https://code.jquery.com/jquery-3.5.1.js"></script>  
    <script src="https://cdn.datatables.net/1.11.4/js/jquery.dataTables.min.js"></script>
    <script src="https://cdn.datatables.net/1.11.4/js/dataTables.bootstrap5.min.js"></script>
</head>
<body>
     
<div class="container">
    <h3 class="text-center mt-3 mb-4">laravel 9 yajra datatables example - Itwebtuts</h3>
    <table class="table table-bordered data-table">
        <thead>
            <tr>
                <th>No</th>
                <th>Name</th>
                <th>Email</th>
                <th width="100px" class="text-center">Action</th>
            </tr>
        </thead>
        <tbody>
        </tbody>
    </table>
</div>
     
</body>
     
<script type="text/javascript">
  $(function () {
      
    var table = $('.data-table').DataTable({
        processing: true,
        serverSide: true,
        ajax: "{{ route('users.index') }}",
        columns: [
            {data: 'id', name: 'id'},
            {data: 'name', name: 'name'},
            {data: 'email', name: 'email'},
            {data: 'action', name: 'action', orderable: false, searchable: false},
        ]
    });
      
  });
</script>
</html>
Run Laravel App:
All the required steps have been done, now you have to type the given below command and hit enter to run the Laravel app:
php artisan serve
Now, Go to your web browser, type the given URL and view the app output:
http://localhost:8000/users
I hope it can help you...

React Native App using Stack Navigator Example

React Native App using Stack Navigator Tutorial

Hi dev,

Today, I will learn you how to use react native app using stack navigator. We will look at an example of how to implement stack navigation in react native app using stack navigator. This tutorial will give you a simple example of basics of creating a react native navigator. if you want to see an example of how to use React Navigation in your app to add navigation.

React Native is one of the most popular cross-platform app development frameworks. Using JavaScript, you can react develop native apps for both Android and iOS.

One important part of creating apps is being able to navigate between screens.

So let's start following example:

Step 1 : Project Install In the first step Run the following command for create project.
expo init stack-navigation
Step 2 : Install packages
yarn add @react-navigation/native
yarn add react-native-safe-area-context
yarn add @react-navigation/stack
expo install react-native-gesture-handler
yarn add react-native-gesture-handler
Then after add code in App.js file App.js
import 'react-native-gesture-handler';
import { StatusBar } from 'expo-status-bar';
import { NavigationContainer } from '@react-navigation/native';
import { createStackNavigator } from '@react-navigation/stack';
import { StyleSheet, Text, View } from 'react-native';
import HomeScreen from './screens/HomeScreen';
import ProfileScreen from './screens/ProfileScreen';

const Stack = createStackNavigator();

export default function App() {
    return (
        <NavigationContainer>
            <Stack.Navigator>
            <Stack.Screen name="Home" component={HomeScreen} />
            <Stack.Screen name="Profile Screen" component={ProfileScreen} />
            </Stack.Navigator>
        </NavigationContainer>
    );
}
screens/HomeScreen.js
import React from 'react';
import { NavigationContainer } from '@react-navigation/native';
import { StyleSheet, Text, View, Button } from 'react-native';

export default function HomeScreen({navigation}) {
    return (
        <View style={{flex: 1,alignItems: 'center', justifyContent:'center'}}>
            <Text style={{ marginBottom: '2%' }}>Home Screen / Feed</Text>
            <Button title="Profile Screen" onPress={()=>navigation.navigate('Profile Screen')} />
        </View>
    );
}
ProfileScreen.jsx
import React from 'react';
import { StyleSheet, Text, View } from 'react-native';

export default function ProfileScreen() {
  return (
    <View style={{flex: 1,alignItems: 'center', justifyContent:'center'}}>
        <Text>Profile Screen</Text>
    </View>
  );
}
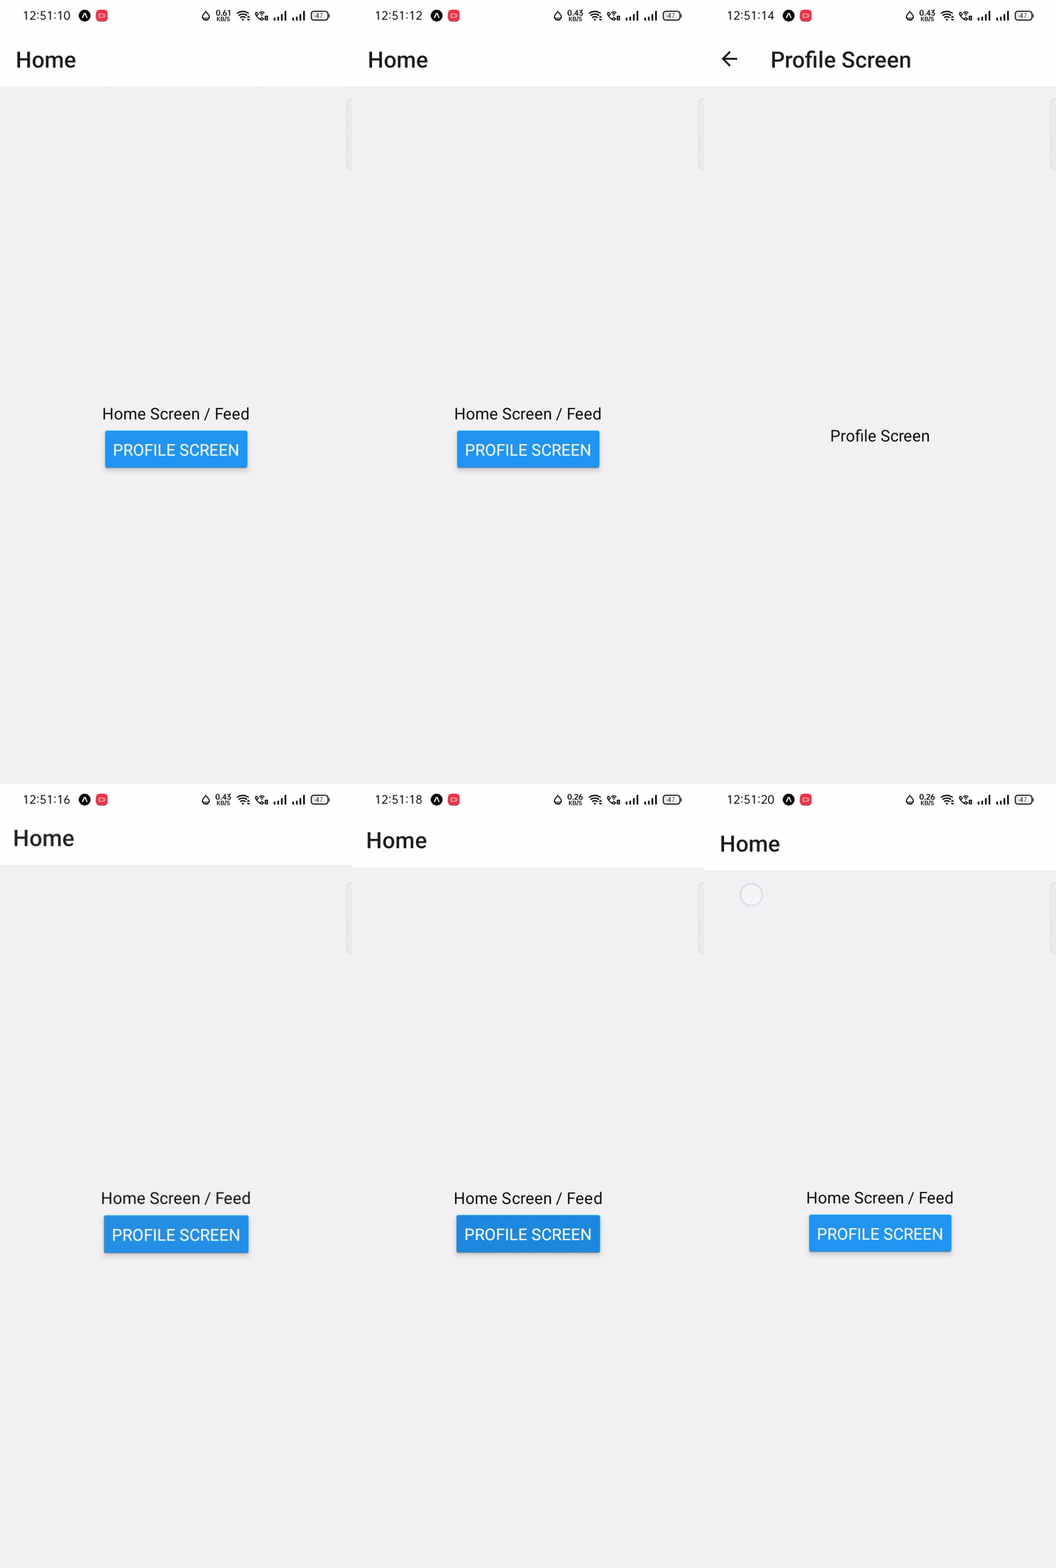
Output
React Native App using Stack Navigator Example

I hope it can help you...

Laravel 9 Ajax FullCalendar Example

Laravel 9 Ajax FullCalendar Example

Hi Dev,

In this blog, I explain laravel 9 ajax full calendar tutorial with example. I will show to you, how you can integrate a full calendar in laravel 9 application. I have written step-by-step instructions of laravel 9 FullCalendar ajax.

This comprehensive guide, step by step, explains how to add and integrate FullCalendar in Laravel not only but also how to use FullCalendar in the Laravel 9 application.

Step 1: Install Laravel 9

In this step download the new laravel application. Open your command prompt and copy paste this command:

composer create-project laravel/laravel laravel-fullcalendar
Step 2: Create Migration and Model

In this step create migration and model for events table, fire this command:

php artisan make:migration create_events_table

After this command you will find one file in following path "database/migrations" and you have to put bellow code in your migration file for create events table.

<?php
  
use Illuminate\Database\Migrations\Migration;
use Illuminate\Database\Schema\Blueprint;
use Illuminate\Support\Facades\Schema;
  
return new class extends Migration
{
    /**
     * Run the migrations.
     *
     * @return void
     */
    public function up()
    {
        Schema::create('events', function (Blueprint $table) {
            $table->id();
            $table->string('title');
            $table->date('start');
            $table->date('end');
            $table->timestamps();
        });
    }
  
    /**
     * Reverse the migrations.
     *
     * @return void
     */
    public function down()
    {
        Schema::dropIfExists('events');
    }
};
Then after, run migration:
php artisan migrate

Now that you have created the event model, type your code into it. Copy the following model to write the code. This code you put in your Event.php model.

app/Models/Event.php
<?php
  
namespace App\Models;
  
use Illuminate\Database\Eloquent\Factories\HasFactory;
use Illuminate\Database\Eloquent\Model;
  
class Event extends Model
{
    use HasFactory;
  
    /**
     * The attributes that are mass assignable.
     *
     * @var array

     */
    protected $fillable = [
        'title', 'start', 'end'
    ];
}
Step 3: Create Controller File

Now require to create new FullCalenderController for index and ajax method so first run bellow command :

php artisan make:controller FullCalenderController

After this command you can find FullCalenderController.php file in your app/Http/Controllers directory. open FullCalenderController.php file and put bellow code in that file.

app/Http/Controllers/FullCalenderController.php
<?php
  
namespace App\Http\Controllers;
  
use Illuminate\Http\Request;
use App\Models\Event;
  
class FullCalenderController extends Controller
{
    /**
     * Write code on Method
     *
     * @return response()
     */
    public function index(Request $request)
    {
        if($request->ajax()) {
       
            $data = Event::whereDate('start', '>=', $request->start)
                       ->whereDate('end',   '<=', $request->end)
                       ->get(['id', 'title', 'start', 'end']);
  
            return response()->json($data);
        }
  
        return view('fullcalender');
    }
 
    /**
     * Write code on Method
     *
     * @return response()
     */
    public function ajax(Request $request)
    {
        switch ($request->type) {
           case 'add':
                $event = Event::create([
                    'title' => $request->title,
                    'start' => $request->start,
                    'end' => $request->end,
                ]);
 
                return response()->json($event);
            break;
  
            case 'update':
                $event = Event::find($request->id)->update([
                    'title' => $request->title,
                    'start' => $request->start,
                    'end' => $request->end,
                ]);
 
                return response()->json($event);
            break;
  
            case 'delete':
                $event = Event::find($request->id)->delete();
                
                return response()->json($event);
            break;
             
            default:
            # code...
            break;
        }
    }
}
Step 4: Create Routes

In this step we will add routes and controller file so first add bellow route in your routes.php file.

routes/web.php
<?php
  
use Illuminate\Support\Facades\Route;
  
use App\Http\Controllers\FullCalenderController;
  
/*
|--------------------------------------------------------------------------
| Web Routes
|--------------------------------------------------------------------------
|
| Here is where you can register web routes for your application. These
| routes are loaded by the RouteServiceProvider within a group which
| contains the "web" middleware group. Now create something great!
|
*/
  
Route::controller(FullCalenderController::class)->group(function(){
    Route::get('fullcalender', 'index');
    Route::post('fullcalenderAjax', 'ajax');
});
Step 5: Create Blade File

Ok, in this last step we will create fullcalender.blade.php file for display fullcalender and we will write js code for crud app. So first create fullcalender.blade.php file and put bellow code:

resources/views/fullcalender.blade.php
<!DOCTYPE html>
<html>
<head>
    <title>Laravel 9 Ajax FullCalendar Tutorial with Example - Itwebtuts</title>
    <meta name="csrf-token" content="{{ csrf_token() }}">
    <link href="https://cdn.jsdelivr.net/npm/bootstrap@5.0.2/dist/css/bootstrap.min.css" rel="stylesheet">
    <link rel="stylesheet" href="https://cdnjs.cloudflare.com/ajax/libs/fullcalendar/3.9.0/fullcalendar.css" />
    <link rel="stylesheet" href="https://cdnjs.cloudflare.com/ajax/libs/toastr.js/latest/toastr.min.css" />
    <script src="https://cdnjs.cloudflare.com/ajax/libs/jquery/3.1.1/jquery.min.js"></script>
    <script src="https://cdnjs.cloudflare.com/ajax/libs/moment.js/2.24.0/moment.min.js"></script>
    <script src="https://cdnjs.cloudflare.com/ajax/libs/fullcalendar/3.9.0/fullcalendar.js"></script>
    <script src="https://cdnjs.cloudflare.com/ajax/libs/toastr.js/latest/toastr.min.js"></script>
</head>
<body>
    
<div class="container text-center">
    <h2 class="m-5">Laravel 9 Ajax FullCalendar Tutorial with Example - Itwebtuts</h2>
    <div id='calendar'></div>
</div>
  
<script type="text/javascript">
  
$(document).ready(function () {
      
    /*------------------------------------------
    --------------------------------------------
    Get Site URL
    --------------------------------------------
    --------------------------------------------*/
    var SITEURL = "{{ url('/') }}";
    
    /*------------------------------------------
    --------------------------------------------
    CSRF Token Setup
    --------------------------------------------
    --------------------------------------------*/
    $.ajaxSetup({
        headers: {
        'X-CSRF-TOKEN': $('meta[name="csrf-token"]').attr('content')
        }
    });
      
    /*------------------------------------------
    --------------------------------------------
    FullCalender JS Code
    --------------------------------------------
    --------------------------------------------*/
    var calendar = $('#calendar').fullCalendar({
                    editable: true,
                    events: SITEURL + "/fullcalender",
                    displayEventTime: false,
                    editable: true,
                    eventRender: function (event, element, view) {
                        if (event.allDay === 'true') {
                                event.allDay = true;
                        } else {
                                event.allDay = false;
                        }
                    },
                    selectable: true,
                    selectHelper: true,
                    select: function (start, end, allDay) {
                        var title = prompt('Event Title:');
                        if (title) {
                            var start = $.fullCalendar.formatDate(start, "Y-MM-DD");
                            var end = $.fullCalendar.formatDate(end, "Y-MM-DD");
                            $.ajax({
                                url: SITEURL + "/fullcalenderAjax",
                                data: {
                                    title: title,
                                    start: start,
                                    end: end,
                                    type: 'add'
                                },
                                type: "POST",
                                success: function (data) {
                                    displayMessage("Event Created Successfully");
  
                                    calendar.fullCalendar('renderEvent',
                                        {
                                            id: data.id,
                                            title: title,
                                            start: start,
                                            end: end,
                                            allDay: allDay
                                        },true);
  
                                    calendar.fullCalendar('unselect');
                                }
                            });
                        }
                    },
                    eventDrop: function (event, delta) {
                        var start = $.fullCalendar.formatDate(event.start, "Y-MM-DD");
                        var end = $.fullCalendar.formatDate(event.end, "Y-MM-DD");
  
                        $.ajax({
                            url: SITEURL + '/fullcalenderAjax',
                            data: {
                                title: event.title,
                                start: start,
                                end: end,
                                id: event.id,
                                type: 'update'
                            },
                            type: "POST",
                            success: function (response) {
                                displayMessage("Event Updated Successfully");
                            }
                        });
                    },
                    eventClick: function (event) {
                        var deleteMsg = confirm("Do you really want to delete?");
                        if (deleteMsg) {
                            $.ajax({
                                type: "POST",
                                url: SITEURL + '/fullcalenderAjax',
                                data: {
                                        id: event.id,
                                        type: 'delete'
                                },
                                success: function (response) {
                                    calendar.fullCalendar('removeEvents', event.id);
                                    displayMessage("Event Deleted Successfully");
                                }
                            });
                        }
                    }
 
                });
 
    });
      
    /*------------------------------------------
    --------------------------------------------
    Toastr Success Code
    --------------------------------------------
    --------------------------------------------*/
    function displayMessage(message) {
        toastr.success(message, 'Event');
    } 
    
</script>
  
</body>
</html>
Run Laravel App:

All the required steps have been done, now you have to type the given below command and hit enter to run the Laravel app:

php artisan serve

Now, Go to your web browser, type the given URL and view the app output:

http://localhost:8000/fullcalender

I think you must have liked this example.....