
Hi dev,

In this blog, I explain you how to integrate razorpay payment gateway in laravel 9. we will learn how to integrate a razorpay payment gateway in laravel 9 application. I will share with you how to integrate Razorpay payment gateway in Laravel 9 application with example. I will share with you how to integrate Razorpay payment gateway in Laravel 9 application with example. In this Laravel 9 Razorpay Payment Gateway Integration Tutorial with Example tutorial.
In this tutorial you will learn to integrate Razorpay in laravel 9. In this step by step tutorial I’ll share laravel 9 Razorpay integration example.
Razorpay is very simple, hassle free and easy to integrate payment gateway. Integrating Razorpay payment gateway in laravel 9 is a breeze. Razorpay is one of the popular payment gateway, that allows us to accept payment from your customer.
So let's start following example:
Step 1: Install Laravel 9In this step This is optional; however, if you have not created the laravel app, then you may go ahead and execute the below command:
composer create-project laravel/laravel laravel-razorpay-paymentStep 2: Create Razorpay Account
First you need to create account on razorpay. then you can easily get account key id and key secret.
Create Account from here: www.razorpay.com.
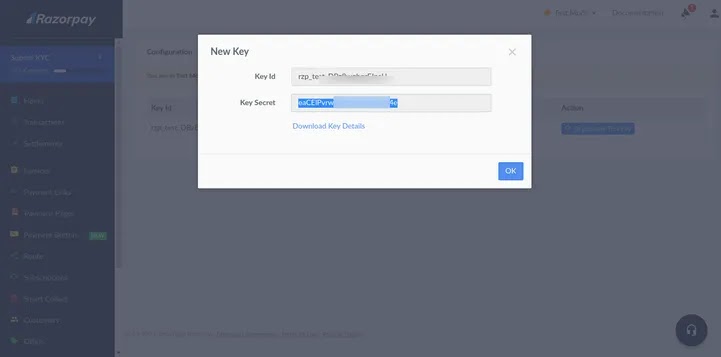
After register successfully. you need to go bellow link and get id and secret as bellow screen shot:
Go Here: https://dashboard.razorpay.com/app/keys.
Next you can get account key id and secret and add on .env file as like bellow:
.envRAZORPAY_KEY=rzp_test_XXXXXXXXX RAZORPAY_SECRET=XXXXXXXXXXXXXXXXStep 3: Install razorpay/razorpay Package
In this step, we need to install razorpay/razorpay composer package to use razorpay api. so let's run bellow command:
composer require razorpay/razorpayStep 4: Create Route
now we will create one route for calling our example, so let's add new route to web.php file as bellow:
routes/web.php
<?php

use Illuminate\Support\Facades\Route;

use App\Http\Controllers\RazorpayPaymentController;

/*
|--------------------------------------------------------------------------
| Web Routes
|--------------------------------------------------------------------------
|
| Here is where you can register web routes for your application. These
| routes are loaded by the RouteServiceProvider within a group which
| contains the "web" middleware group. Now create something great!
|
*/

Route::get('razorpay-payment', [RazorpayPaymentController::class, 'index']);
Route::post('razorpay-payment', [RazorpayPaymentController::class, 'store'])->name('razorpay.payment.store');
Step 5: Create Controller
in this step, we will create RazorpayPaymentController and write send sms logic, so let's add new route to web.php file as bellow:
app/Http/Controllers/RazorpayPaymentController.php
<?php

namespace App\Http\Controllers;

use Illuminate\Http\Request;
use Razorpay\Api\Api;
use Session;
use Exception;

class RazorpayPaymentController extends Controller
{
    /**
     * Write code on Method
     *
     * @return response()
     */
    public function index()
    {
        return view('razorpayView');
    }

    /**
     * Write code on Method
     *
     * @return response()
     */
    public function store(Request $request)
    {
        $input = $request->all();

        $api = new Api(env('RAZORPAY_KEY'), env('RAZORPAY_SECRET'));

        $payment = $api->payment->fetch($input['razorpay_payment_id']);

        if(count($input)  && !empty($input['razorpay_payment_id'])) {
            try {
                $response = $api->payment->fetch($input['razorpay_payment_id'])->capture(array('amount'=>$payment['amount']));

            } catch (Exception $e) {
                return  $e->getMessage();
                Session::put('error',$e->getMessage());
                return redirect()->back();
            }
        }

        Session::put('success', 'Payment successful');
        return redirect()->back();
    }
}
Step 6: Create Blade File
now we need to add blade file. so let's create razorpayView.blade.php file and put bellow code:
resources/views/razorpayView.blade.php
<!DOCTYPE html>
<html lang="{{ str_replace('_', '-', app()->getLocale()) }}">
<head>
    <meta charset="utf-8">
    <meta name="viewport" content="width=device-width, initial-scale=1">
    <!-- CSRF Token -->
    <meta name="csrf-token" content="{{ csrf_token() }}">
    <title>Laravel 9 Integrate Razorpay Payment Gateway Example - Itwebtuts</title>
    <script src="https://cdnjs.cloudflare.com/ajax/libs/jquery/3.6.0/jquery.min.js" crossorigin="anonymous"></script>
    <link rel="stylesheet" href="https://maxcdn.bootstrapcdn.com/bootstrap/4.0.0/css/bootstrap.min.css" integrity="sha384-Gn5384xqQ1aoWXA+058RXPxPg6fy4IWvTNh0E263XmFcJlSAwiGgFAW/dAiS6JXm" crossorigin="anonymous">
</head>
<body>
    <div id="app">
        <main class="py-4">
            <div class="container">
                <div class="row">
                    <div class="col-md-6 offset-3 col-md-offset-6">

                        @if($message = Session::get('error'))
                            <div class="alert alert-danger alert-dismissible fade in" role="alert">
                                <button type="button" class="close" data-dismiss="alert" aria-label="Close">
                                    <span aria-hidden="true">×</span>
                                </button>
                                <strong>Error!</strong> {{ $message }}
                            </div>
                        @endif

                        @if($message = Session::get('success'))
                            <div class="alert alert-success alert-dismissible fade {{ Session::has('success') ? 'show' : 'in' }}" role="alert">
                                <button type="button" class="close" data-dismiss="alert" aria-label="Close">
                                    <span aria-hidden="true">×</span>
                                </button>
                                <strong>Success!</strong> {{ $message }}
                            </div>
                        @endif

                        <div class="card card-default">
                            <div class="card-header">
                                Laravel - Razorpay Payment Gateway Integration
                            </div>

                            <div class="card-body text-center">
                                <form action="{{ route('razorpay.payment.store') }}" method="POST" >
                                    @csrf
                                    <script src="https://checkout.razorpay.com/v1/checkout.js"
                                            data-key="{{ env('RAZORPAY_KEY') }}"
                                            data-amount="1000"
                                            data-buttontext="Pay 10 INR"
                                            data-name="ItSolutionStuff.com"
                                            data-description="Rozerpay"
                                            data-image="https://www.itsolutionstuff.com/frontTheme/images/logo.png"
                                            data-prefill.name="name"
                                            data-prefill.email="email"
                                            data-theme.color="#ff7529">
                                    </script>
                                </form>
                            </div>
                        </div>

                    </div>
                </div>
            </div>
        </main>
    </div>
</body>
</html>
Run Laravel App:
All the required steps have been done, now you have to type the given below command and hit enter to run the Laravel app:
php artisan serve
Now, Go to your web browser, type the given URL and view the app output:
http://localhost:8000/razorpay-paymentOutput:

you can get testing card for razorpay from here: Click Here.
Now you can run and check.
I hope it can help you...
No comments:
Post a Comment